Chevrolet Cruze Infotainment System: CD Player
The CD player is capable of playing:
• Most audio CDs
• CD-R
• CD-RW
• MP3, unprotected WMA, and AAC formats
When playing any compatible recordable disc, the sound quality may be reduced due to the disc, the method of recording, the quality of the music recorded, or how the disc has been handled.
There may be increased skipping, difficulty reading recorded tracks, finding tracks, and/or loading and ejecting. If these problems occur, check the disc for damage or try a known good disc.
To avoid damage to the CD player: • Do not use scratched or damaged discs.
• Do not apply labels to discs. The labels could get caught in the player.
• Insert only one disc at a time.
• Keep the loading slot free of foreign materials, liquids, and debris.
• Use a marking pen to label the top of the disc.
Loading and Ejecting Discs
To load a disc:
1. Turn the vehicle on.
2. Insert a disc into the slot, right side up. The player pulls it in the rest of the way. If the disc is damaged or improperly loaded, there is an error and the disc ejects.
The disc automatically plays once loaded.
Press  to eject a disc from the CD
player. If the disc is not removed within a short period of time, it is automatically
pulled back into the player.
to eject a disc from the CD
player. If the disc is not removed within a short period of time, it is automatically
pulled back into the player.
Playing an Audio CD
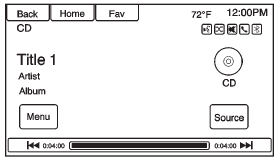
1. Press the CD screen button on the Home Page or select CD from the source pop-up to display the CD main page.
2. Press the Menu screen button to display the menu options.
3. Press to select the option.
On the CD main page, the track number displays and the Song, Artist, and Album information displays when available.
Use the following radio controls to play the disc:
 (Play/Pause
): Use to pause or resume play.
 (Previous/Reverse):
• Press to seek to the beginning of the current or previous track.
If the track has been playing for less than five seconds, it seeks to the previous track. If longer than five seconds, the current track starts from the beginning.
• Press and hold to fast reverse through a track. Release the button to return to playing speed. Elapsed time displays.
 (Next/Fast Forward):
• Press to seek to the next track.
• Press and hold to fast forward through a track. Release the button to return to playing speed. Elapsed time displays.
MENU/SEL or MENU Knob: Turn to the right or left to select the next or previous track. Press this knob to select from the list. If a track is selected from the menu, the system plays the track and returns to the CD screen.
Error Messages
If Disc Error displays and/or the disc comes out, it could be due to: • The disc has an invalid or unknown format.
• The disc is very hot. Try the disc again when the temperature returns to normal.
• The road is very rough. Try the disc again when the road is smoother.
• The disc is dirty, scratched, wet, or upside down.
• The air is very humid. Try the disc again later.
• There was a problem while burning the disc.
• The label is caught in the CD player.
If the CD is not playing correctly, try a known good CD.
If any error continues, contact your dealer.
 Audio Players
...
 USB
USB
Playing from a USB
A USB mass storage or Certified Windows Vista®/Media Transfer Protocol (MTP)
device can be connected to the USB port.
The USB port is in the center console.
The USB icon displa ...
Other materials:
Brake System Warning Light
The vehicle brake system consists of two hydraulic circuits. If one circuit is
not working, the remaining circuit can still work to stop the vehicle. For normal
braking performance, both circuits need to be working.
If the warning light comes on, there is a brake problem. Have the brake system ...
Engine Exhaust
WARNING
Engine exhaust contains carbon monoxide (CO) which cannot be seen or smelled.
Exposure to CO can cause unconsciousness and even death.
Exhaust may enter the vehicle if:
• The vehicle idles in areas with poor ventilation (parking garages, tunnels, deep
snow that may block underbody air ...
Tire Terminology and Definitions
Air Pressure: The amount of air inside the tire pressing outward on each
square inch of the tire. Air pressure is expressed in kPa (kilopascal) or psi (pounds
per square inch).
Accessory Weight: The combined weight of optional accessories. Some examples
of optional accessories are automatic t ...
