Chevrolet Cruze Repair Manual: Air Conditioning Compressor and Condenser Hose Replacement (1.6L LXT)
Removal Procedure
- Recover the refrigerant. Refer to Refrigerant Rec overy and Recharging.
- Remove front bumper fascia. Refer to Front Bumper Fascia Replacement.
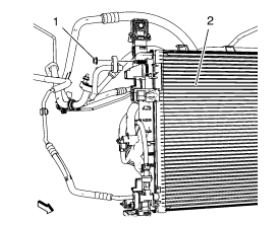
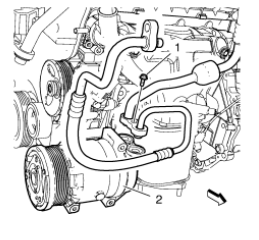
- Remove A/C compressor and condenser hose nut (1) from A/C condensor (2).
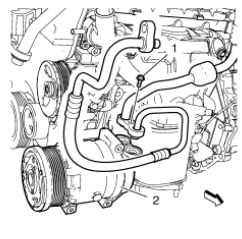
- Remove A/C compressor and condenser hose bolt (1) from A/C compressor (2).
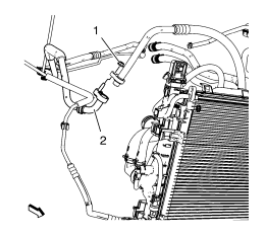
- Remove A/C compressor and condenser hose nut (1) from refrigerant hose (2).
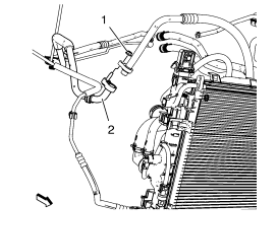
- Remove A/C compressor and condenser hose.
Installation Procedure
Note: Use NEW O-ring seals. Refer to O-Ring Replacement.
- Install A/C compressor and condenser hose.
Caution: Refer to Fastener Caution in the Preface section.
- Install A/C compressor and condenser hose nut (1) to refrigerant hose (2). Tighten nut to 19 N·m (14 lb ft).
- Install A/C compressor and condenser hose bolt (1) to A/C compressor (2). Tighten bolt to 19 N·m (14 lb ft).
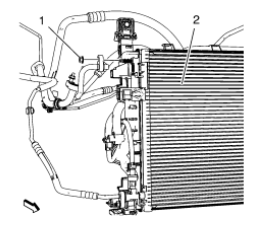
- Install air conditioning compressor and condenser hose nut (1) to A/C condenser (2). Tighten nut to 19 N·m (14 lb ft).
- Install front bumper fascia. Refer to Front Bumper Fascia Replacement.
- Evacuate and charge the refrigerant system. Refer to Refrigerant Recovery and Recharging.
 Air Conditioning Compressor Replacement (1.6L LXT)
Preliminary Procedures
Recover the refrigerant. Refer to Refrigerant Rec overy and
Recharging.
Remove drive belt. Refer to Generator and Air Conditioning Compressor
and Power Ste ...
 Air Conditioning Compressor and Condenser Hose Replacement (1.6L LDE, LXV,
and 1.8L 2H0)
Air Conditioning Compressor and Condenser Hose Replacement (1.6L LDE, LXV,
and 1.8L 2H0)
Removal Procedure
Recover the refrigerant. Refer to Refrigerant Recovery and Recharging
Remove front bumper fascia. Refer to Front Bumper Fascia Replacement
Remove A/C compressor and c ...
Other materials:
Instrument Panel Wiring Harness Replacement
Removal Procedure
Remove instrument panel compartment assembly. Refer to Instrument
Panel Compartment Replacement.
Remove instrument panel wiring harness (2) from instrument panel tie bar
(1).
Disconnect electrical connectors.
Installation Procedure
Ins ...
Shifting out of Park
This vehicle is equipped with an automatic transmission shift lock control system.
The shift lock is designed to:
• Prevent ignition key removal unless the shift lever is in P (Park) with the shift
lever button fully released.
• Prevent movement of the shift lever out of P (Park) unless the ig ...
Exterior Care
Washing the Vehicle
To preserve the vehicle's finish, wash it often and out of direct sunlight.
Notice: Do not use petroleum-based, acidic, or abrasive cleaning agents
as they can damage the vehicle's paint, metal, or plastic parts.
If damage occurs, it would not be covered by the vehic ...
