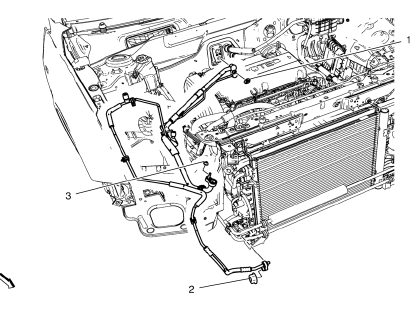
Chevrolet Cruze Repair Manual: Air Conditioning Evaporator Hose Assembly Replacement
Preliminary Procedures
- Recover the refrigerant. Refer to Refrigerant Recovery and Recharging.
- Remove the headlamp - right side. Refer to Headlamp Replacement.
- Loosen power steering fluid reservoir screw.
- Remove brake pipes from the dash lower extension panel.
- Remove engine mount. Refer to Engine Mount Replacement.
- Air Conditioning Evaporator Hose Assembly Nut to Air Conditioning Evaporator Thermal Expansion Valve
Caution: Refer to Fastener Caution in the Preface section.
Tighten 19 N·m (14 lb ft)
- Air Conditioning Evaporator Hose Assembly Nut to Air Conditioning Condenser
Tighten 19 N·m (14 lb ft)
- Air Conditioning Evaporator Hose Assembly Nut to Air Conditioning Compressor and Condenser Hose
Tighten 19 N·m (14 lb ft)
 Air Conditioning Compressor and Condenser Hose Replacement (1.6L LDE, LXV,
and 1.8L 2H0)
Air Conditioning Compressor and Condenser Hose Replacement (1.6L LDE, LXV,
and 1.8L 2H0)
Removal Procedure
Recover the refrigerant. Refer to Refrigerant Recovery and Recharging
Remove front bumper fascia. Refer to Front Bumper Fascia Replacement
Remove A/C compressor and c ...
 Air Conditioning Condenser Replacement (1.6L LDE, LXT, LXV, and 1.8L 2H0)
Removal Procedure
Recover the refrigerant. Refer to Refrigerant Recovery and Recharging.
Disconnect battery negative cable. Refer to Battery Negative Cable
Disconnection and Connection.
Rem ...
Other materials:
Instrument Panel Outer Air Outlet Replacement - Left Side
Preliminary Procedure
Remove instrument panel lower trim pad cover - left side. Refer to
Instrument Panel Lower Trim Pad Cover Replacement.
Remove instrument panel cluster trim plate. Refer to Instrument Panel
Cluster Trim Plate Replacement.
Remove instrument panel cluster lo ...
Headlamp High/Low-Beam Changer
(Headlamp High/Low-Beam Changer):
Push the turn signal lever away from you and release to turn the high beams on.
To return to low beams, push the lever again or pull it toward you and release.
This indicator light turns on in the instrument cluster when the high-beam headlamps
are on. ...
Dome Lamps
The dome lamp controls are in the headliner.
(Dome Lamp Override): Press
to turn the lamps off, even when a door is open.
(Door): Press to turn the
lamps on automatically when a door is opened.
(On): Press to turn on the
dome lamps. ...
