Chevrolet Cruze Repair Manual: Air Hose Test
Caution: The air hose test should only be used on fully cured urethane adhesive. Otherwise, damage to the urethane adhesive bead could result in additional leaks.
- Using a liquid detergent, diluted with water in a spray bottle, spray the window at the edges. Begin at the bottom and gradually move up and across the top.
Note: The compressed air should not exceed 205 kPa (30 psi).
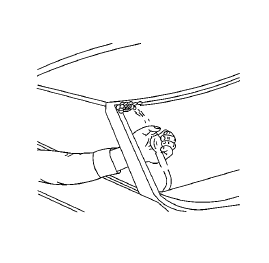
- Have an assistant inside of the vehicle with an air hose.
- Have the assistant aim the compressed air at the suspected areas.
Bubbles will form in the soap solution at the location of the leak.
 Water Hose Test
Note: Use a water hose without the nozzle attached.
Have an assistant inside of the vehicle i 1. n order to locate the leak.
Begin testing at the base of the window or the windshield.
Slow ...
 Body Waterleak Repair
Warning: If the vehicle interior is exposed to moisture and becomes
soaked up to the level of the sensing and diagnostic module (SDM),
the SDM and SDM harness connector must be replaced. The SD ...
Other materials:
Installation Procedure
Cut the rear side rail in corresponding locations to fit the remaining
original panel. The sectioning joint should be trimmed to allow a
gap of one-and-one-half-times the metal thickness at the sectioning joint.
Create a 50 mm (2 in) backing plate from the unused portion of the
serv ...
Navigation System
If the vehicle has a navigation system, there is a separate navigation manual
that includes information on the radio, audio players, and navigation system.
The navigation system provides detailed maps of most major freeways and roads.
After a destination has been set, the system provides turn-b ...
Satellite Radio
SiriusXM® Satellite Radio
Vehicles with a valid SiriusXM satellite radio subscription can receive SiriusXM
programming.
SiriusXM satellite radio has a wide variety of programming and commercial-free
music, coast to coast, and in digital-quality sound.
See www.siriusxm.com or call 1-866-635- ...
