Chevrolet Cruze Repair Manual: Backup Lamp Replacement
Preliminary Procedures
- Remove the rear compartment sill trim plate. Refer to Rear Compartment Sill Trim Plate Replacement.
- Disconnect the electrical harness connector from the backup lamp socket.
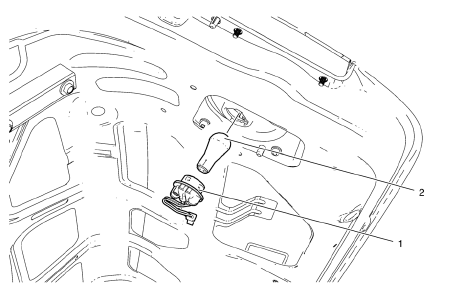
- Back Up Lamp Nut (Qty: 4)
Caution: Refer to Fastener Caution in the Preface section.
Tighten 5 N·m (44 lb ft)
- Back Up Lamp Assembly
Warning: Refer to Glass and Sheet Metal Handling Warning in the Preface section.
Warning: Refer to Halogen Bulb Warning in the Preface section.
Procedure
- Reach inside the rear compartment lid inner panel and remove the lower and upper retainer nuts securing the lamp assembly to the outer rear compartment lid panel.
- Push the inside edge of the lamp assembly outward from the rear outer compartment lid panel.
- Remove and transfer the bulb socket from the back up lamp assembly.
Backup Lamp Bulb Replacement
Warning: Refer to Glass and Sheet Metal Handling Warning in the Preface section.
Preliminary Procedure
Remove the rear compartment sill trim plate. Refer to Rear Compartment Sill Trim Plate Replacement.
- Back Up Lamp Socket
Tip
Rotate the lamp socket counterclockwise and remove from the tail lamp housing.
- Back Up Lamp Bulb
Warning: Refer to Halogen Bulb Warning in the Preface section.
Procedure
Remove the bulb from the lamp socket.
 Fog Lamp Aiming
Preparation Procedure
Important: Horizontal aim is not adjustable on this vehicle.
Vertical aim is done by an adjusting nut located on the rear of the fog lamp.
Prior to aiming the fog lamps, pe ...
 Forward Lamp Wiring Harness Replacement
Preliminary Procedures
Remove the front bumper. Refer to Front Bumper Fascia Replacement.
Remove the headlamp. Refer to Headlamp Replacement.
Using a scan tool, check for DTCs.
Forward ...
Other materials:
Replacing Airbag System Parts after a Crash
WARNING
A crash can damage the airbag systems in the vehicle.
A damaged airbag system may not work properly and may not protect you and your
passenger(s) in a crash, resulting in serious injury or even death. To help make
sure the airbag systems are working properly after a crash, have them in ...
Front Side Door Wiring Harness Replacement
Preliminary Procedure
Remove the front side door inner panel trim. Refer to Front Side Door Trim
Replacement.
Front Side Door Wiring Harness
Warning: Unless directed otherwise, the ignition and start switch must be
in the OFF or LOCK position, and all electrical
loads must be OFF before ...
Air/Wind Noise
Special Tools
CH-39570 Chassis Ear
GE-41416 Ultrasonic Leak Detector
Warning: Refer to Assistant Driving Warning in the Preface section.
To analyze a reported windnoise condition, test drive the vehicle to
determine the origin of the noise.
Choose a regular route with smooth and strai ...
