Chevrolet Cruze Repair Manual: Forward Lamp Wiring Harness Replacement
Preliminary Procedures
- Remove the front bumper. Refer to Front Bumper Fascia Replacement.
- Remove the headlamp. Refer to Headlamp Replacement.
- Using a scan tool, check for DTCs.
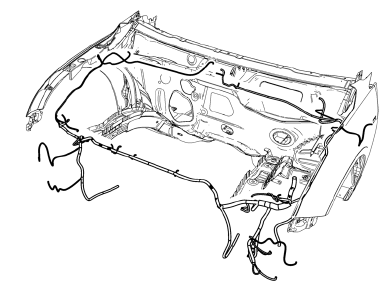
Forward Lamp Wiring Harness
Tip
- Create a work area large enough to lay out the new and old wiring harnesses.
- Use care when removing inaccessible harness retainers. Replacement retainers may not be available.
- Compare the new and old wiring harnesses for the same part number, the same number of wiring harness connectors, the same pin settings, and the same harness retainers.
- Follow a logical order of steps during the replacement to ensure proper installation of the harness.
Rear License Plate Lamp Replacement
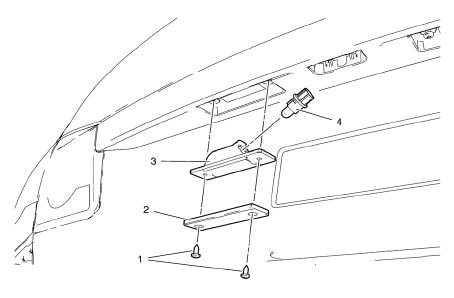
- Rear License Plate Lamp Screw (Qty: 2)
Caution: Refer to Fastener Caution in the Preface section.
Tighten 3 N·m (27 lb in)
- Rear License Plate Lamp
Tip
Rotate the left corner of the lamp assembly upward and pull the right side down out from the rear bumper fascia opening.
- Rear License Plate Lamp Socket
Tip
Rotate the lamp socket counterclockwise and remove.
- Rear License Plate Lamp Bulb
Tip
Service the bulb, as needed.
 Backup Lamp Replacement
Preliminary Procedures
Remove the rear compartment sill trim plate. Refer to Rear Compartment
Sill Trim Plate Replacement.
Disconnect the electrical harness connector from the backu ...
 Tail Lamp Replacement
Preliminary Procedures
Open and support the rear compartment
lid.
Remove the body side trim panel replacement in order to expose the tail
lamp pocket nuts. Refer to Body Side Tr ...
Other materials:
Air/Wind Noise
Special Tools
CH-39570 Chassis Ear
GE-41416 Ultrasonic Leak Detector
Warning: Refer to Assistant Driving Warning in the Preface section.
To analyze a reported windnoise condition, test drive the vehicle to
determine the origin of the noise.
Choose a regular route with smooth and strai ...
Removal Procedure
Warning: Refer to Approved Equipment for Collision Repair Warning in
the Preface section.
Warning: Refer to Glass and Sheet Metal Handling Warning in the Preface
section.
Disable the SIR System. Refer to SIR Disabling and Enabling.
Disconnect the negative battery cable. Refer to Bat ...
StabiliTrak® Syste
The StabiliTrak system assists with directional control of the vehicle in difficult
driving conditions. The system is on when the vehicle is started.
• To turn off both Traction Control and StabiliTrak, press and hold
until
and
illuminate in the instrument cluster.
• Press again to turn o ...
