Chevrolet Cruze Repair Manual: Frame and Underbody
Specifications
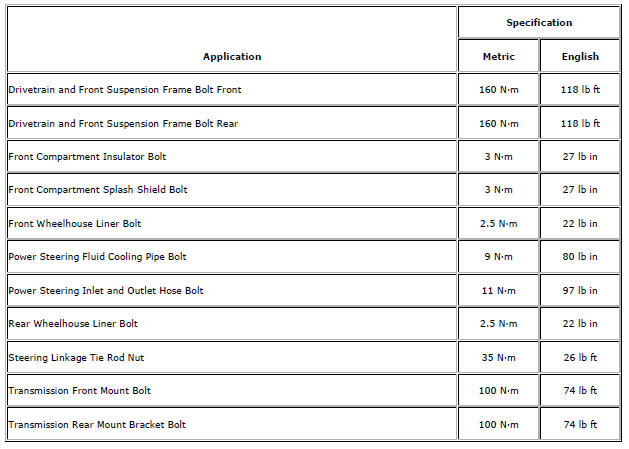
Engine Shield Replacement
Preliminary Procedure
Raise and support the vehicle. Refer to Lifting and Jacking the Vehicle.
- Engine Shield Bolt (Qty: 4)
Caution: Refer to Fastener Caution in the Preface section.
Tighten 40 N·m (30 lb ft)
- Engine Shield
Front Compartment Insulator Replacement
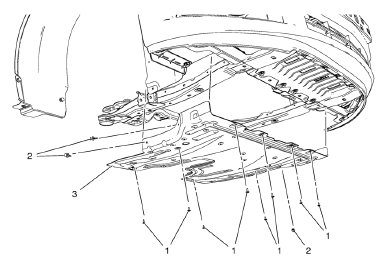
Preliminary Procedure
Raise and support the vehicle. Refer to Lifting and Jacking the Vehicle.
- Front Compartment Insulator Screw (Qty: 8)
Caution: Refer to Fastener Caution in the Preface section.
Tighten 3 N·m (3 lb in)
- Front Compartment Insulator Plastic Retainer (Qty: 3)
- Front Compartment Insulator
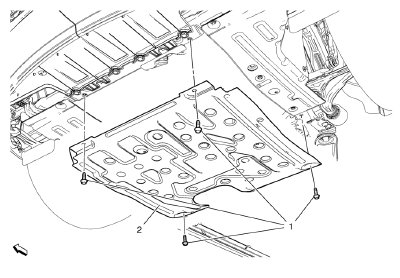
Front Compartment Splash Shield Replacement
- Front Compartment Splash Shield Retainer (Qty: 2)
- Front Compartment Splash Shield Bolt (Qty: 3)
Caution: Refer to Fastener Caution in the Preface section.
Tighten 3 N·m (27 lb in)
- Front Compartment Splash Shield
- Drivetrain and Front Suspension Frame Replacement
- Drivetrain and Front Suspension Frame Insulator Replacement
 Ultra High Strength Dual Phase Steel
This information provides repair recommendations and general guidelines for
steel classified as Ultra High Strength Dual Phase Steel (Dual
Phase Steel with a tensile strength greater than 800 MPa), ...
 Drivetrain and Front Suspension Frame Replacement
Special Tools
CH 904 Underframe
CH 49289 Centering Adapter
For equivalent regional tools, refer to Special Tools. ...
Other materials:
Odometer
The odometer shows how far the vehicle has been driven, in either kilometers
or miles.
This vehicle has a tamper-resistant odometer. The digital odometer will read
999,999 if it is turned back.
If the vehicle needs a new odometer installed, it must be set to the mileage
total of the old odom ...
Deployment Outside Vehicle - Steering Wheel Module, Instrument Panel
Module, and Roof Rail Module
Deploy the inflator module outside of the vehicle when the vehicle will be
returned to service. Situations that require deployment outside
of the vehicle include the following:
Using the SIR diagnostics, you determine that the inflator module is
malfunctioning
The inflator module is cosm ...
Using the System
The infotainment system is controlled by touching the screen, and by using the
knobs and other buttons.
Voice recognition, through the steering wheel controls, can be used to control
the infotainment features.
Press on the steering wheel controls
to begin voice recognition.
See Voice Recog ...
