Chevrolet Cruze Repair Manual: Front Side Door Check Replacement
Prliminary Procedure
- Remove front side door trim panel. Refer to Front Side Door Trim Replacement
- Remove the front side door water deflector. Refer to Front Side Door Water Deflector Replacement
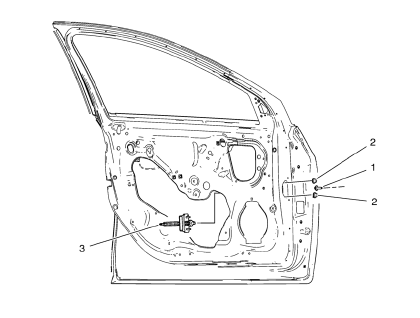
- Front Side Door Check Link Bolt
Caution: Refer to Fastener Caution in the Preface section.
Tip
Place the door in the full open position.
Tighten
25 N·m (18 lb ft)
- Front Side Door Check Link Nut
Procedure
Remove the water deflector.
Tighten 9 N·m (79 lb in)
- Front Side Door Check
Fuel Tank Filler Door Replacement
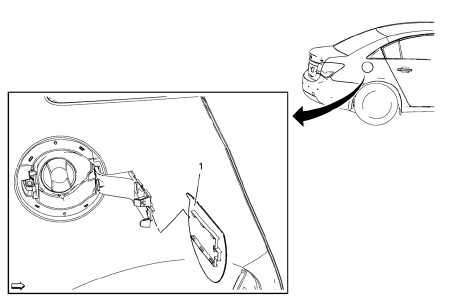
- Fuel Tank Filler Door
Procedure
Open the fuel tank filler door
 Rear Compartment Lid Replacement
Preliminary Procedure
Remove the rear compartment lid inner panel trim. Refer to Rear Compartment
Lid Inner Panel Trim Replacement.
Rear Compartment Lid Hinge Bolt (Qty: 4)
Caution: Refer ...
 Fuel Tank Filler Pipe Housing Replacement
Preliminary Procedure
Remove rear wheelhouse panel liner. Refer to Rear Wheelhouse Panel Liner
Replacement.
Remove fuel tank filler door. Refer to Fuel Tank Filler Door
Replacement.
...
Other materials:
Removal Procedure
Warning: Refer to Cracked Window Warning in the Preface section.
Warning: Refer to Glass and Sheet Metal Handling Warning in the Preface section
Note: Position the vehicle on level ground and move the front
wheels to the straight-ahead position.
Disconnect battery.
Remove air inlet grill ...
Removal Procedure
Warning: Refer to Approved Equipment for Collision Repair Warning in the
Preface section.
Warning: Refer to Glass and Sheet Metal Handling Warning in the Preface section.
Disable the SIR System. Refer to SIR Disabling
and Enabling.
Disconnect the negative battery cable. Refer to Batter ...
Front Fender Front Lower Bracket Replacement
Preliminary Procedure
Remove the front bumper fascia. Refer to Front Bumper Fascia
Replacement.
Remove the headlamp. Refer to Headlamp Replacement
Remove the front fender. Refer to Front Fender Replacement.
Front Fender Bracket Bolt
Caution: Refer to Fastener Caut ...
