Chevrolet Cruze Repair Manual: Front Side Door Replacement
Preliminary Procedure
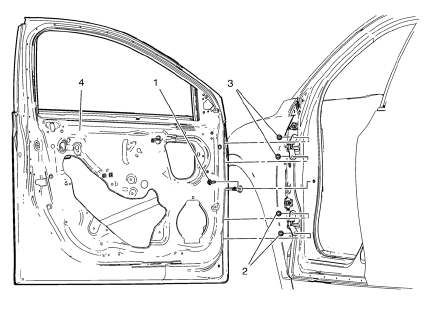
Remove the front side door trim panel. Refer to Front Side Door Trim Replacement.
- Front Side Door Check Link Bolt
Caution: Refer to Fastener Caution in the Preface section.
Procedure
- Remove the water deflector.
- Disconnect the door electrical connector.
- Support the door before removing the hinge bolts.
- With the aid of an assistant, remove the door.
Tighten 25 N·m (18 lb ft)
- Front Side Door Lower Hinge Bolt (Qty: 2)
Tighten 25 N·m (18 lb ft)
- Front Side Door Upper Hinge Bolt (Qty: 2)
Tighten 25 N·m (18 lb ft)
- Front Side Door
Procedure
- Transfer all of the internal components.
- Adjust the front side door as needed. Refer to Front Side Door Adjustment.
 Front Side Door Adjustment
Preliminary Procedure
Remove the front wheelhouse liner. Refer to Front Wheelhouse Liner
Replacement.
Front Side Door
Caution: Refer to Fastener Caution in the Preface section.
Procedure
...
 Rear Side Door Adjustment
Rear Side Door
Caution: Refer to Fastener Caution in the Preface section.
Procedure
Loosen the rear door hinge bolt (Qty: 4) to adjust the rear door.
Adjust the rear door in order to ...
Other materials:
Driver or Passenger Seat Retractor Side Belt Replacement
Warning: Refer to SIR Warning in the Preface section.
Warning: In order to prevent accidental deployment and the risk of personal
injury, do not dispose of an undeployed inflatable
restraint seat belt pretensioner as normal shop waste. Undeployed seat belt
pretensioners contain substance ...
Air Conditioning Compressor and Condenser Hose Replacement (1.6L LDE, LXV,
and 1.8L 2H0)
Removal Procedure
Recover the refrigerant. Refer to Refrigerant Recovery and Recharging
Remove front bumper fascia. Refer to Front Bumper Fascia Replacement
Remove A/C compressor and condenser hose nut (1) from A/C condenser (2).
Remove A/C compressor and condenser hose bol ...
Installation Procedure
Cut the body lock pillar outer panel in corresponding locations to fit
the remaining original panel. The sectioning joint should be
trimmed to allow a gap of one-and-one-half-times the metal thickness at the
sectioning joint
Create a 50 mm (2 in) backing plate from the unused portio ...
