Chevrolet Cruze Repair Manual: Headlamp Aiming Procedure
- Open the hood.
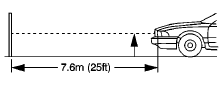
- Measure from the floor to the center of the headlamp bulb. Some headlamps have an aim dot marked on the headlamp lens.
- At the screen, measure from the floor and place the horizontal tape at the measured distance.
- Measure from the reference line on the floor to the left headlamp bulb centerline.
- At the screen, measure from the reference line and place the vertical tape at the measured distance.
- Measure from the reference line on the floor to the right headlamp bulb centerline.
- At the screen, measure from the reference line and place the vertical tape at the measured distance.
Important: DO NOT cover the headlamp. This may cause excessive heat build up.
- Turn ON the low beam headlamps. Block the light from projecting onto the screen from the passenger side headlamp.
Important: The headlamps can not be adjusted horizontally.
- Adjust the vertical aim screw of the headlamps to the specifications required by the state and the local authorities, or as shown in step number 8.
- Repeat the aiming procedure for the passenger side headlamp while blocking the light from projecting onto the screen from the driver side headlamp.
- Turn the headlamps OFF.
- Close the hood.
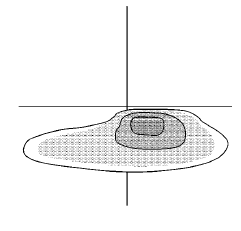
 Visual Aiming Preparation Procedure
Important: Some state and local laws specify requirements for
headlamp aim. Comply with all of these laws when performing any
headlamp aiming operations.
Headlamp aim should be checked:
When a ...
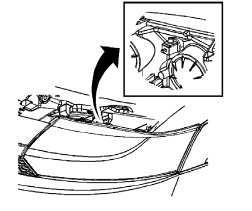
 Front Fog Lamp Replacement
Preliminary Procedures
Raise and support the vehicle. Refer to Lifting
and Jacking the Vehicle.
Remove the front bumper fascia. Refer to Front Bumper Fascia
Replacement.
Disco ...
Other materials:
Turn Signal Switch Replacement
Preliminary Procedure
Remove the steering column upper trim cover. Refer to Steering Column
Upper Trim Cover Replacement.
Remove the steering column lower trim cover. Refer to Steering Column
Lower Trim Cover Replacement.
Turn Signal Switch
Procedure
Disconnect any elec ...
Courtesy Transportation Program
To enhance your ownership experience, we and our participating dealers are proud
to offer Courtesy Transportation, a customer support program for vehicles with the
Bumper-to-Bumper (Base Warranty Coverage period in Canada), extended powertrain,
and/or hybrid-specific warranties in both the U.S ...
All-Season Tires
This vehicle may come with all-season tires. These tires are designed to provide
good overall performance on most road surfaces and weather conditions. Original
equipment tires designed to GM's specific tire performance criteria have a TPC specification
code molded onto the sidewall. Origi ...
