Chevrolet Cruze Repair Manual: Installation Procedure
- Remove all mounds or loose pieces of urethane adhesive from the pinch-weld area.
- Inspect for any of the following problems in order to help prevent future breakage of the window:
- High weld
- Solder spots
- Hardened sealer
- Any other obstruction or irregularity in the pinch-weld flange
- After repairing the opening as indicated, perform the following steps:
Remove all traces of broken glass from the outer cowl panel, seats and floor.
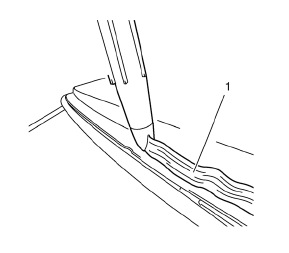
- Apply adhesive bead (1).
Cut into the tip of the cartridge in such a way that a bead of adhesive approx. 13 mm (0.511 in) thick is produced.
- Insert rear window.
- Place the rear window at the upper area and lower down.
- Insert rear window with BO-641 holder .
- Second mechanic required.
- Secure windshield in position with fabric tape.
- Clean any excess urethane adhesive from the body.
- Use a soft spray of warm water in order to immediately water test the window.
- Inspect the window for leaks.
- If any leaks are found, use a plastic paddle in order to apply extra urethane adhesive at the leak point.
- Retest the window for leaks.
- Maintain the following conditions in order to properly cure the urethane adhesive:
- Partially lower a door window in order to prevent pressure buildups when closing doors before the urethane adhesive cures.
- Do not drive the vehicle until the urethane adhesive is cured. Refer to the above curing times.
- Do not use compressed air in order to dry the urethane adhesive.
- Connect the electrical connectors from the rear window defogger bus bars.
- Connect the rear window radio antenna connector.
- Install quarter window garnish molding. Refer to Windshield Garnish Molding Replacement
- Connect battery.
Front Side Door Window Switch Replacement - Right Side
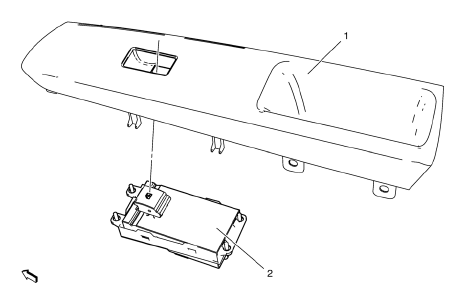
- Front Side Door Window Switch Bezel
Refer to Front Side Door Window Switch Bezel Replacement.
- Front Side Door Window Switch Assembly
Procedure
Disconnect electrical connector.
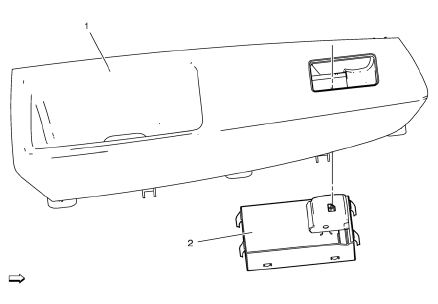
Front Side Door Window Switch Replacement - Left Side

- Front Side Door Window Switch Bezel
Refer to Front Side Door Window Switch Bezel Replacement.
- Front and Rear Side Door Window Switch Assembly
Procedure
Disconnect electrical connector
Rear Side Door Window Switch Replacement
- Rear Side Door Window Switch Bezel
Refer to Rear Side Door Window Switch Bezel Replacement.
- Rear Side Door Window Switch Assembly
Procedure
Disconnect electrical connector.
Front Side Door Window Regulator Replacement
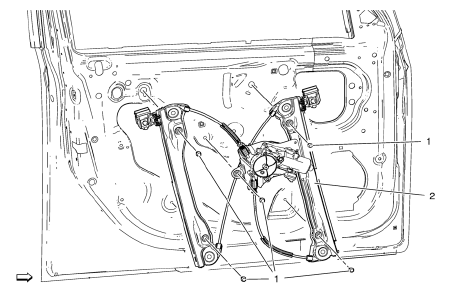
Preliminary Procedure
Remove the front side door window. Refer to Front Side Door Window Replacement.
- Front Side Door Window Regulator Screw (Qty: 5)
Caution: Refer to Fastener Caution in the Preface section.
Tighten 9 N·m (80 lb in)
- Front Side Door Window Regulator Assembly
 Removal Procedure
Warning: Refer to Cracked Window Warning in the Preface section.
Warning: Refer to Glass and Sheet Metal Handling Warning in the Preface section.
Note: Position the vehicle on level ground and mov ...
 Front Side Door Window Regulator Motor Replacement
Preliminary Procedure
Remove the front side door window regulator. Refer to Front Side Door Window
Regulator Replacement.
Front Side Door Window Regulator Motor Screw (Qty: 3)
Caution: R ...
Other materials:
Rear Bumper Fascia Outer Guide Replacement
Preliminary Procedure
Remove the rear bumper fascia. Refer to Rear Bumper Fascia Replacement.
Rear Bumper Fascia Outer Guide Rivet (Qty: 3)
Special Tools
BO-594-A Hand Rivet Tongs
For equivalent regional tools, refer to Special Tools.
Rear Bumper Fascia Outer Guide
...
Wheel Alignment - Steering Wheel Angle and/or Front Toe Adjustment
Ensure that the steering wheel is set in a straight ahead position.
Loosen the tie rod jam nut (1).
Adjust the toe to specification by turning the adjuster (2). Refer to
Wheel Alignment Specifications.
Caution: Refer to Fastener Caution in the Preface section.
Tighten the tie ro ...
Configure Menu
The Configuration Menu is used to adjust features and preferences, such as Sound,
Radio, Nav (Navigation), Display, or Time Settings.
1. Press the Config screen button on the Home Page.
2. Touch-tap the scroll bar until the desired option displays. Select the desired
settings to change.
S ...
