
Chevrolet Cruze Repair Manual: Rear Compartment Lid Emblem/Nameplate Replacement (LT or LTZ)
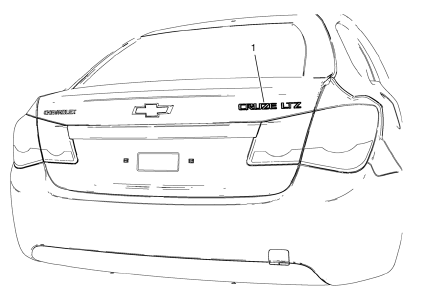
Rear Compartment Lid Emblem Assembly
Caution: Refer to Exterior Trim Emblem Removal Caution in the Preface section.
Procedure
- The part and surface should be 21°C (70°F) prior to installation. The vehicle should remain 21°C (70°F) for one hour after assembly to allow adhesive to develop sufficient bond strength.
- Use a Heat Gun or equivalent to remove the old emblem. Clean all adhesive from the rear compartment panel and wipe the surface dry with a clean lint-free towel prior to installing the new emblem.
- When removing protective liners from the adhesive tape, be careful not to touch tape with hands and do not allow tape to come in contact with dirt or any foreign matter prior to adhesion.
- Close the rear compartment lid prior to adhesion.
- Using the palm of the hand, wet out the emblem to the rear compartment lid to ensure full adhesion of the emblem is made.
 Rear Compartment Lid Emblem/Nameplate Replacement (Rear Emblem)
Rear Compartment Lid Emblem Assembly
Caution: Refer to Exterior Trim Emblem Removal Caution in the
Preface section.
Procedure
The part and surface should be 21°C (70°F) prior to installati ...
 Rear Compartment Lid Emblem/Nameplate Replacement (VCDi)
Rear Compartment Lid Emblem Assembly
Caution: Refer to Exterior Trim Emblem Removal Caution in the
Preface section.
Procedure
The part and surface should be 21°C (70°F) prior to installati ...
Other materials:
Removal Procedure
Disable the SIR System. Refer to SIR Disabling and Enabling.
Disconnect the negative battery cable. Refer to Battery Negative Cable
Disconnection and Connection.
Remove all related panels and components.
Visually inspect the damage. Repair as much of the damage as possible.
Remove the ...
Doing Your Own Service Work
WARNING
It can be dangerous to work on your vehicle if you do not have the proper
knowledge, service manual, tools, or parts. Always follow owner manual procedures
and consult the service manual for your vehicle before doing any service work.
If doing some of your own service work, use the pro ...
Windshield Garnish Molding Replacement
Preliminary Procedure
Disable the SIR system. Refer to SIR Disabling and Enabling.
Windshield Garnish Molding Assembly
Procedure
Loosen tether clip and steel clips.
Disconnect electrical connector.
The tether clip at the upper portion of the garnish molding MUST be
repla ...
