Chevrolet Cruze Repair Manual: Rear Side Door Window Replacement
Preliminary Procedures
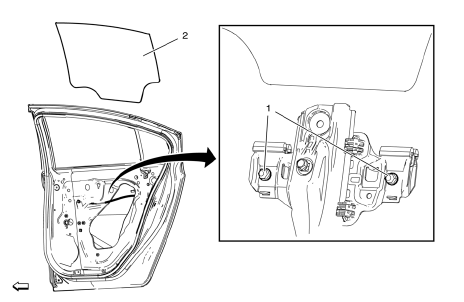
- Position the window approximately half way down in the door.
- Remove the water deflector. Refer to Rear Side Door Water Deflector Replacement.
- Remove the outer sealing strip. Refer to Rear Side Door Window Outer Sealing Strip Replacement.
- Rear Side Door Window Regulator Sash Nut (Qty: 2)
Caution: Refer to Fastener Caution in the Preface section.
Tighten 9 N·m (80 lb in)
- Rear Side Door Window
Procedure
- Loosen the window regulator sash nuts, pull upward to release the window from the sash.
- Rotate the rear door window as necessary to remove it from the door.
 Rear Side Door Window Adjustment
Warning: Refer to Glass and Sheet Metal Handling Warning in the Preface
section.
Warning: Refer to Express Window Down Warning in the Preface section.
Preliminary Procedures
Remove the r ...
 Rear Side Door Stationary Window Replacement
Preliminary Procedures
Remove the rear side door trim panel. Refer to Rear Side Door Trim
Replacement.
Remove the rear side water deflector. Refer to Rear Side Door Water
Deflect ...
Other materials:
Engine Overheating
There is an engine coolant temperature gauge on the vehicle instrument cluster
to warn of engine overheating.
If the decision is made not to lift the hood when this warning appears, get service
help right away.
If the decision is made to lift the hood, make sure the vehicle is parked on
a le ...
Removal Procedure
Warning: Refer to Approved Equipment for Collision Repair Warning in the
Preface section.
Warning: Refer to Collision Sectioning Warning in the Preface section.
Warning: Refer to Glass and Sheet Metal Handling Warning in the Preface section.
Disable the SIR System. Refer to SIR &nbs ...
Tyre and Wheel Removal and Installation
Removal Procedure
Raise and suitably support the vehicle. Refer to Lifting and Jacking the
Vehicle.
Remove the wheel center cap.
Mark the relationship of the wheel (2) to the hub.
Remove the wheel nuts (1).
Warning: If penetrating oil gets on the vertical surfaces between the ...
