
Chevrolet Cruze Owners Manual: Reclining Seatbacks
WARNING
If either seatback is not locked, it could move forward in a sudden stop or crash. That could cause injury to the person sitting there.
Always push and pull on the seatbacks to be sure they are locked.
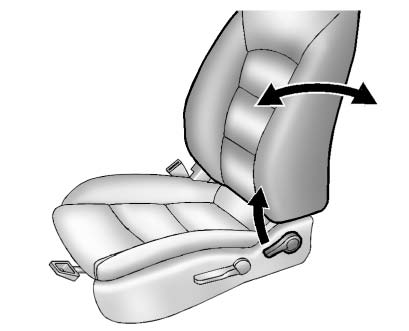
To recline the seatback: 1. Lift the lever.
If necessary, move the safety belt out of the way to access the lever.
2. Move the seatback to the desired position, then release the lever to lock the seatback in place.
3. Push and pull on the seatback to make sure it is locked.
To return the seatback to an upright position: 1. Lift the lever fully without applying pressure to the seatback, and the seatback returns to the upright position.
2. Push and pull on the seatback to make sure it is locked.
WARNING
Sitting in a reclined position when the vehicle is in motion can be dangerous. Even when buckled up, the safety belts cannot do their job.
The shoulder belt will not be against your body. Instead, it will be in front of you. In a crash, you could go into it, receiving neck or other injuries.
The lap belt could go up over your abdomen. The belt forces would be there, not at your pelvic bones. This could cause serious internal injuries.
For proper protection when the vehicle is in motion, have the seatback upright. Then sit well back in the seat and wear the safety belt properly.
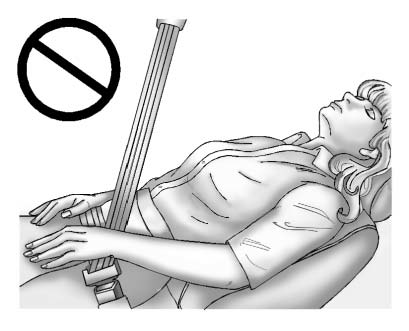
Do not have a seatback reclined if the vehicle is moving.
 Power Seat Adjustment
To adjust the power driver seat, if equipped:
• Move the seat forward or rearward by sliding the control forward or rearward.
• Raise or lower the front part of the seat cushion by moving th ...
 Heated Front Seats
WARNING
If you cannot feel temperature change or pain to the skin, the seat heater
may cause burns. To reduce the risk of burns, people with such a condition should
use care when using the seat h ...
Other materials:
Inflatable Restraint Passenger Presence Detection System - If Equipped
Note: The passenger presence detection system includes an ECU and a
sensor mat that can be serviced separately. After repairing or
replacing any part of the passenger presence detection system, the system must
be rezeroed in order to function properly.
The passenger presence detection system i ...
Radio Reception
Frequency interference and static can occur during normal radio reception if
items such as phone chargers, vehicle convenience accessories, and external electronic
devices are plugged into the accessory power outlet. If there is interference or
static, unplug the item from the accessory power ...
Front Suspension
Specifications
Front Suspension Components
Drivetrain and Front Suspension Frame
Front Stabilizer Shaft
Drivetrain and Front Suspension Frame Rear Insulator
Front Stabilizer Shaft Link
Front Suspension Strut Insulator Assembly
Front Spring
Shock Absorber Assembly
Front Whe ...
