Chevrolet Cruze Repair Manual: Removal Procedure
- Disable the SIR System. Refer to SIR Disabling and Enabling.
- Disconnect the negative battery cable. Refer to Battery Negative Cable Disconnection and Connection.
- Remove all related panels and components.
- Visually inspect the damage. Repair as much of the damage as possible.
- Remove the sealers and anti-corrosion materials from the repair area, as necessary. Refer to Anti-Corrosion Treatment and Repair.
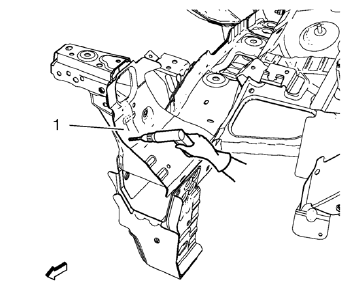
- Locate and mark all the necessary factory welds of the front end sheet metal cross panel reinforcement (1).
- Drill all factory welds. Note the number and location of welds for installation of the service assembly.
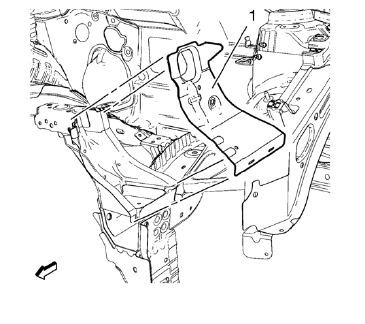
- Remove the front end sheet metal cross panel reinforcement (1).
- Drill all factory welds.
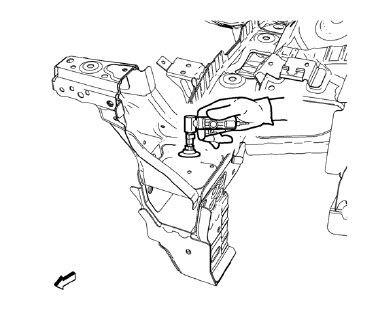
- Grind factory welds of the front end upper tie bar.
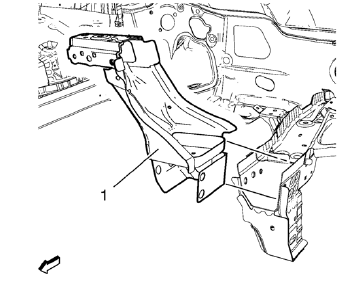
- Remove the front end upper tie bar (1).
 Front End Upper Tie Bar Replacement (MAG-Welding)
Note: According to different corrosion warranties, only the
regional mandatory joining methods are allowed. ...
 Installation Procedure
Position the front end upper tie bar (1) on the vehicle.
Verify the fit of the front end upper tie bar.
Clamp the front end upper tie bar into position.
Weld seam accordingly.
...
Other materials:
Fuel and Evaporative Emission Pipe Warning
Warning: In order to reduce the risk of fire and personal injury observe
the following items:
Replace all nylon fuel pipes that are nicked, scratched or damaged
during installation, do not attempt to repair the sections of the
nylon fuel pipes
Do not hammer directly on the fuel harness ...
Steering Wheel Controls
For vehicles with audio steering wheel controls, some audio controls can be adjusted
at the steering wheel.
: For vehicles with a Bluetooth,
OnStar, or navigation system, press to interact with those systems.
: Press to silence the vehicle speakers
only. Press again to turn the sound on. ...
Transmission
Driver Shift Control (DSC) allows the automatic transmission to be shifted similar
to a manual transmission.
Electronic Range Select (ERS) allows for the selection of a range of gears.
Up-Shift Light
If the vehicle has a manual transmission, it will have an up-shift light that
indicates whe ...
