Chevrolet Cruze Repair Manual: Removal Procedure
Warning: Refer to Approved Equipment for Collision Repair Warning in the Preface section.
Warning: Refer to Collision Sectioning Warning in the Preface section.
Warning: Refer to Glass and Sheet Metal Handling Warning in the Preface section.
- Disable the SIR System. Refer to SIR Disabling and Enabling.
- Disconnect the negative battery cable. Refer to Battery Negative Cable Disconnection and Connection.
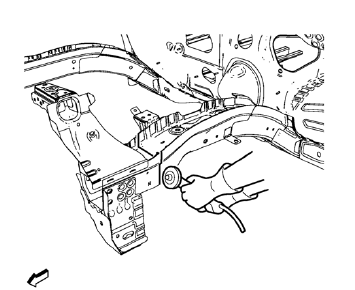
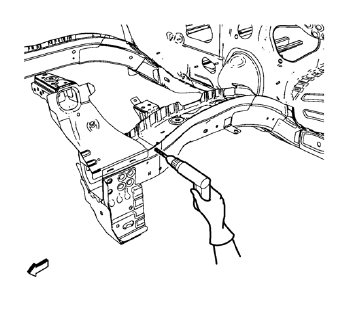
- Remove all related panels and components.
- Visually inspect the damage. Repair as much of the damage as possible.
- Remove the sealers and anti-corrosion materials from the repair area, as necessary. Refer to Anti-Corrosion Treatment and Repair.
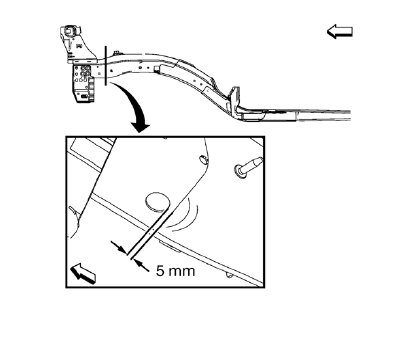
- Create cut lines on the front compartment front rail.
Note: Do not damage internal reinforcement of front compartment side rail.
- Cut the panel where sectioning is to be performed.
Note: Left side only.
- Locate and mark all the necessary factory welds of the front compartment front rail.
- Drill all factory welds. Note the number and location of welds for installation of the service assembly.
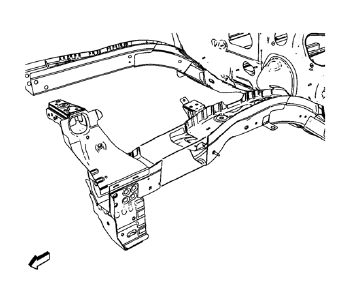
- Remove the damaged front compartment front rail.
 Front Compartment Side Rail Sectioning (Short, MIG-Brazing)
Note: According to different corrosion warranties, only the
regional mandatory joining methods are allowed. ...
 Installation Procedure
Cut the front compartment front rail in corresponding locations to fit
the remaining original panel. The sectioning joint should be
trimmed to allow a gap of one-and-one-half-times the met ...
Other materials:
Bluetooth (Voice Recognition)
Using Voice Recognition
To use voice recognition, press the
button located on the steering wheel.
Use the commands below for the various voice features. For additional information,
say “Help” while you are in a voice recognition menu.
Pairing
A Bluetooth-enabled cell phone must be paired to ...
Driving for Better Fuel Economy
Driving habits can affect fuel mileage. Here are some driving tips to get the
best fuel economy possible.
• Avoid fast starts and accelerate smoothly.
• Brake gradually and avoid abrupt stops.
• Avoid idling the engine for long periods of time.
• When road and weather conditions ar ...
Passenger Airbag Status Indicator
The vehicle has a passenger sensing system.
The instrument panel has a passenger airbag status indicator.
United States
Canada
When the vehicle is started, the passenger airbag status indicator will light
ON and OFF, or the symbol for on and off, for several seconds as a system check.
If ...
