Chevrolet Cruze Repair Manual: Removal Procedure
Warning: Refer to Approved Equipment for Collision Repair Warning in the Preface section.
- Disable the SIR System. Refer to SIR Disabling and Enabling.
- Disconnect the negative battery cable. Refer to Battery Negative Cable Disconnection and Connection.
- Remove all related panels and components.
- Visually inspect the damage. Repair as much of the damage as possible.
- Remove the sealers and anti-corrosion materials from the repair area, as necessary. Refer to Anti-Corrosion Treatment and Repair.
- Locate and mark all factory welds.
- Drill all factory welds. Note the number and location of welds for installation of the service assembly.
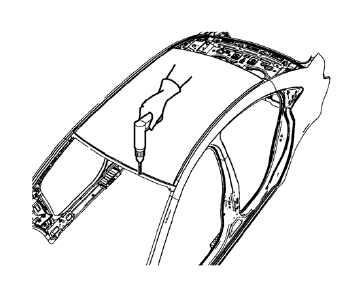
- Cut the adhesive with an appropriate tool.
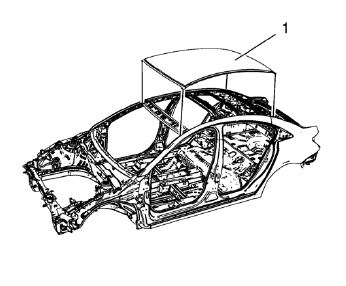
- Remove the damaged roof panel (1).
 Roof Outer Panel Replacement (MIG-Brazing)
Note: According to different corrosion warranties, only the
regional mandatory joining methods are allowed. ...
 Installation Procedure
Clean and prepare the attaching surfaces for welding.
Apply one-part windshield urethane adhesive as noted from the original
panel.
Position the roof panel (1) on the
...
Other materials:
Installation Procedure
Install the following components on the drivetrain and front suspension
frame if removed:
The radiator support brackets.
The stabilizer shaft--Refer to Stabilizer Shaft Replacement.
The lower control arms--Refer to Lower Control Arm Replacement.
The steering gear--Refer to Steering ...
Hands-Free Phone
Using Bluetooth Voice Recognition
To use voice recognition, press the
button on the steering wheel.
Use the commands below for the various voice features. For additional information,
say “Help” while in a voice recognition menu.
Making a Call
Calls can be made using the following commands.
...
Horns
Specifications
Horn Replacement
Preliminary Procedure
Remove the front bumper fascia. Refer to Front Bumper Fascia Replacement.
Horn Nut
Caution: Refer to Fastener Caution in the Preface section.
Tighten
17 N·m (13 lb ft)
Horn
Tip
Disconnect electrical connectors.
St ...
