
Chevrolet Cruze Repair Manual: Removal Procedure
Warning: Refer to Approved Equipment for Collision Repair Warning in the Preface section.
Warning: Refer to Glass and Sheet Metal Handling Warning in the Preface section.
- Disable the SIR System. Refer to SIR Disabling and Enabling.
- Disconnect the negative battery cable. Refer to Battery Negative Cable Disconnection and Connection.
- Remove all related panels and components.
- Visually inspect the damage. Repair as much of the damage as possible.
- Remove the sealers and anti-corrosion materials from the repair area, as necessary. Refer to Anti-Corrosion Treatment and Repair.
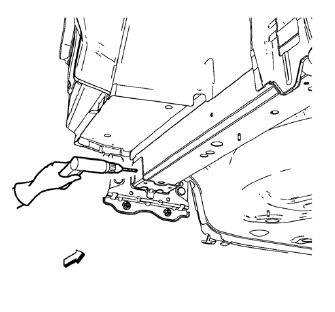
- Locate and mark all the necessary factory welds of the rear end panel plate.
Note: Note the number and location of welds for installation of the service assembly.
- Drill all factory welds.
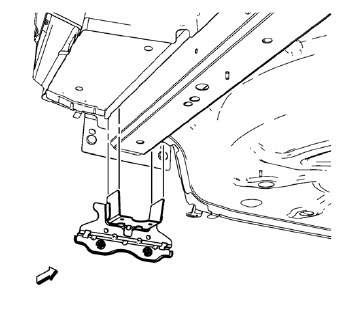
- Remove the underbody rear side rail reinforcement.
 Underbody Rear Side Rail Reinforcement Replacement (MAG-Welding)
Note: According to different corrosion warranties, only the
regional mandatory joining methods are allowed. ...
 Installation Procedure
Note: If the location of the original plug weld holes can
not be determined, space the plug weld holes every 40 mm (1½ in).
Drill 8 mm (5/16 in) for plug welding along the edges of th ...
Other materials:
High Strength Low Alloy Steel
This information provides repair recommendations and general guidelines for
steel classified as High Strength Low Alloy Steel, also known
as HSLA. This type of steel normally has a tensile strength range from 300-700
MPa.
General Motors recommends the following when repairing or replacing th ...
Safety System Check
Now and then, check that the safety belt reminder light, safety belts, buckles,
latch plates, retractors, and anchorages are all working properly.
Look for any other loose or damaged safety belt system parts that might keep
a safety belt system from doing its job. See your dealer to have it rep ...
USB
Playing from a USB
A USB mass storage or Certified Windows Vista®/Media Transfer Protocol (MTP)
device can be connected to the USB port.
The USB port is in the center console.
The USB icon displays when the USB device is connected.
USB Media Formats
The USB port will support the following med ...
