Chevrolet Cruze Repair Manual: Strut, Strut Component, or Spring Replacement
Special Tools
- CH-6068 Spring Tensioner Device
- CH-6066 Holding Device
For equivalent regional tools, refer to Special Tools.
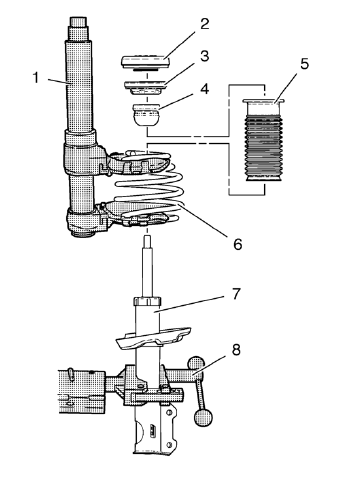
Disassembly Procedure
- Remove the strut assembly. Refer to Strut Assembly Replacement.
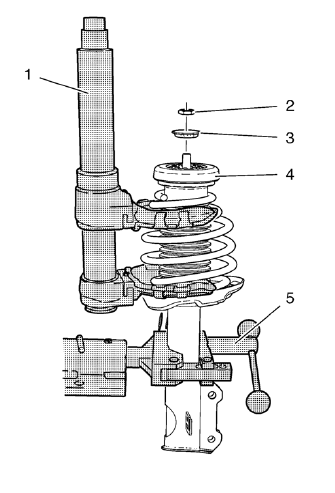
- Install the strut to the CH-6066 holder (5).
- Tension spring (4), using CH-6068 tensioner to remove the spring tension from the upper strut mount.
- Remove the strut nut (2).
- Remove the strut mount insulator washer (3).
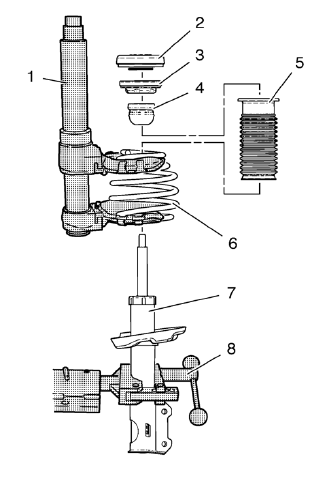
- Remove the front spring strut components:
6.1. Remove the strut mount insulator assembly (2). Inspect for damage and replace as necessary.
6.2. Remove the strut mount bearing assembly (3). Inspect for damage and replace as necessary.
6.3. Remove the bumper (4). Inspect for damage and replace as necessary.
6.4. Remove the insulator (5). Inspect for damage and replace as necessary.
6.5. Remove the spring (6) with CH-6068 tensioner (1).
6.6. Remove the spring tension using the CH-6068 tensioner . Inspect for damage and replace as necessary.
6.7. Remove the strut (7) from CH-6066 holder (8).
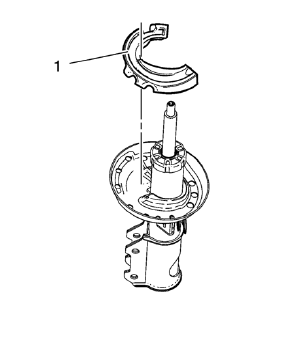
- Remove the lower insulator (1). Inspect for damage and replace as necessary
Assembly Procedure
- Install the lower insulator (1).
- Install the spring strut components:
2.1. Install the strut (7) to the CH-6066 holder (8).
2.2. Install the spring (6) to the CH-6068 tensioner (1), compress spring to remove the spring tension.
2.3. Install the spring (6) to the strut (7).
2.4. Install the insulator (5) to the strut (7).
2.5. Install the bumper (4) to the strut (7).
2.6. Install the strut mount bearing (3) to the strut (7).
2.7. Install the mount insulator assembly (2) to the strut (7).
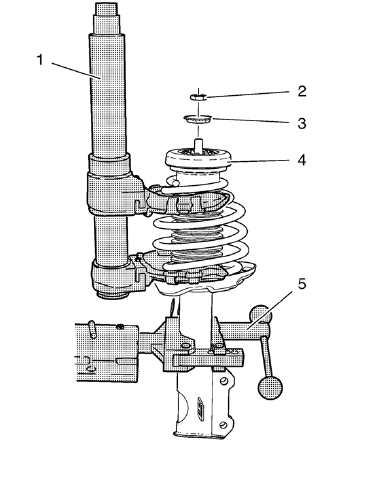
- Install the strut mount insulator washer (3).
Caution: Refer to Fastener Caution in the Preface section.
- Install the strut nut (2) to the strut shaft and tighten to 70 N·m (52 lb ft).
- Remove the CH-6068 tensioner (1) from the spring (4).
- Remove the front strut from CH-6066 holder (5).
- Install the strut assembly. Refer to Strut Assembly Replacement.
 Shock Absorber Disposal
Warning: Use the proper eye protection when drilling to prevent
metal chips from causing physical injury.
Clamp the strut in a vise horizontally with the rod ( 1) completely
extended.
D ...
 Front Suspension Description and Operation
The front suspension has 2 primary purposes:
Isolate the driver from irregularities in the road surface.
Define the ride and handling characteristics of the vehicle.
The front suspension abso ...
Other materials:
Trailer Towing (Except Fuel Economy Model)
Before pulling a trailer, there are three important considerations that have
to do with weight:
• The weight of the trailer.
• The weight of the trailer tongue.
• The total weight on your vehicle's tires.
Weight of the Trailer
How heavy can a trailer safely be? It should never weigh more ...
Turn Signal Switch Replacement
Preliminary Procedure
Remove the steering column upper trim cover. Refer to Steering Column
Upper Trim Cover Replacement.
Remove the steering column lower trim cover. Refer to Steering Column
Lower Trim Cover Replacement.
Turn Signal Switch
Procedure
Disconnect any elec ...
Rear Compartment Lid Emblem/Nameplate Replacement (Cruze - Right Side)
Rear Compartment Lid Emblem Assembly
Caution: Refer to Exterior Trim Emblem Removal Caution in the Preface
section.
Procedure
The part and surface should be 21°C (70°F) prior to installation. The
vehicle should remain 21°C (70°F) for
one hour after assembly to allow adhesive to deve ...
