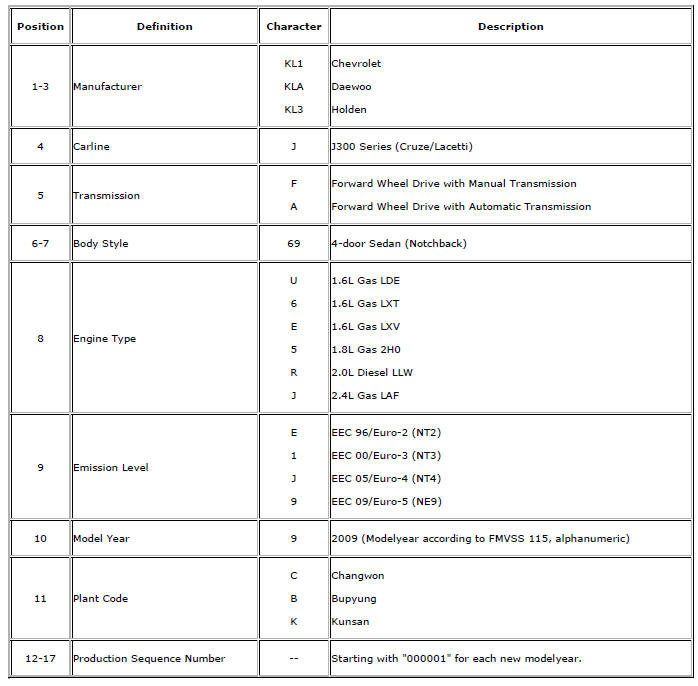
Chevrolet Cruze Repair Manual: Vehicle, Engine and Transmission ID and VIN Location, Derivative and Usage
Note:: Graphic shows exemplary VIN.
The VIN plate is the legal identifier of the vehicle. The VIN plate is located on the upper left corner of the instrument panel (I/P) and can be seen through the windshield from the outside of the vehicle:
 US English/Metric Conversion
Decimal and Metric Equivalents
Arrows and Symbols
This service manual uses various symbols in order to describe different
service operations.
Front of V ...
 Vehicle Certification, Tire Placard, Anti-Theft, and Service Parts ID Label
Vehicle Certification Label
The vehicle certification label is located on the driver door and displays
the following assessments:
Gross Vehicle Weight Rating (GVWR)
Gross Axle Weight Rating ( ...
Other materials:
Rear Compartment Lid Emblem/Nameplate Replacement (LT or LTZ)
Rear Compartment Lid Emblem Assembly
Caution: Refer to Exterior Trim Emblem Removal Caution in the
Preface section.
Procedure
The part and surface should be 21°C (70°F) prior to installation. The
vehicle should remain 21°C (70°F) for
one hour after assembly to allow adhesive to deve ...
Traction Control System (TCS)
The vehicle has a Traction Control System (TCS) that limits wheel spin.
On a front-wheel-drive vehicle, the system operates if it senses that one or
both of the front wheels are spinning or beginning to lose traction. When this happens,
the system brakes the spinning wheel(s), and/or reduces en ...
Installation Procedure
Align the front side door outer panel.
Verify the fit of the front side door outer panel.
Clamp the front side door outer panel
into position.
Pre-flanging the flange with BO-6396 pliers and BO-6392 tool kit .
Continue to hammer in stages along the hem flanges.
...
