Chevrolet Cruze Owners Manual: Windshield Wiper/Washer
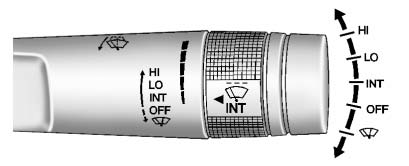
The windshield wiper/washer lever is on the right side of the steering column. With the ignition in ACC/ ACCESSORY or ON/RUN, move the windshield wiper lever to select the wiper speed.
HI:
Use for fast wipes.
LO:
Use for slow wipes.
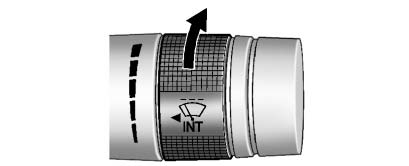
INT: (Intermittent Wipes): Move the lever up to INT for intermittent wipes, then
turn the  INT band up for more frequent
wipes or down for less frequent wipes.
INT band up for more frequent
wipes or down for less frequent wipes.
OFF: Use to turn the wipers off.
 (Mist): For a single wipe, briefly
move the wiper lever down. For several wipes, hold the wiper lever down.
(Mist): For a single wipe, briefly
move the wiper lever down. For several wipes, hold the wiper lever down.
 (Windshield Washer): Pull the windshield
wiper lever toward you to spray windshield washer fluid and activate the wipers.
The wipers will continue until the lever is released or the maximum wash time is
reached. When the windshield wiper lever is released, additional wipes may occur
depending on how long the windshield washer had been activated.
(Windshield Washer): Pull the windshield
wiper lever toward you to spray windshield washer fluid and activate the wipers.
The wipers will continue until the lever is released or the maximum wash time is
reached. When the windshield wiper lever is released, additional wipes may occur
depending on how long the windshield washer had been activated.
WARNING
In freezing weather, do not use the washer until the windshield is warmed. Otherwise the washer fluid can form ice on the windshield, blocking your vision.
Clear snow and ice from the wiper blades and windshield before using them. If frozen to the windshield, carefully loosen or thaw them.
Damaged blades should be replaced.
Heavy snow or ice can overload the wiper motor.
Wipe Parking
If the ignition is turned to LOCK/ OFF while the wipers are on LO, HI, or INT, they will immediately stop.
If the windshield wiper lever is then moved to off before the driver door is opened or within 10 minutes, the wipers will restart and move to the base of the windshield.
If the ignition is turned to LOCK/ OFF while the wipers are performing wipes due to windshield washing, the wipers continue to run until they reach the base of the windshield.
 Horn
Horn
Presson the steering wheel pad to
sound the horn. ...
 Compass
The vehicle may have a compass display in the Driver Information Center (DIC).
The compass receives its heading and other information from the Global Positioning
System (GPS) antenna, StabiliTrak, ...
Other materials:
Satellite Radio
Vehicles with an SiriusXM® Satellite Radio tuner and a valid SiriusXM Satellite
Radio subscription can receive SiriusXM programming.
SiriusXM Satellite Radio Service
SiriusXM is a satellite radio service based in the 48 contiguous United States
and 10 Canadian provinces.
SiriusXM Satellite Ra ...
Recreational Vehicle Towing
Recreational vehicle towing refers to towing the vehicle behind another vehicle
– such as behind a motor home. The two most common types of recreational vehicle
towing are known as dinghy towing and dolly towing. Dinghy towing is towing the
vehicle with all four wheels on the ground. Dolly tow ...
Instrument Panel Cluster Lower Trim Plate Replacement
Preliminary Procedure
Remove instrument panel cluster trim plate. Refer to Instrument Panel Cluster
Trim Plate Replacement.
Instrument Panel Cluster Lower Trim Plate Screw (Qty: 4)
Caution: Refer to Fastener Caution in the Preface section.
Tighten
2.5 N·m (23 lb in)
Instrument Pa ...
