Chevrolet Cruze Owners Manual: Tire Changing
Removing the Spare Tire and Tools
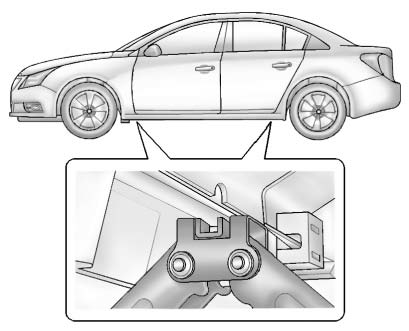
To access the spare tire and tools:
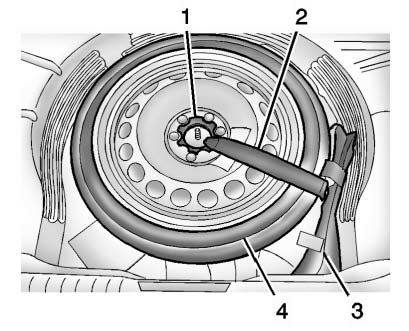
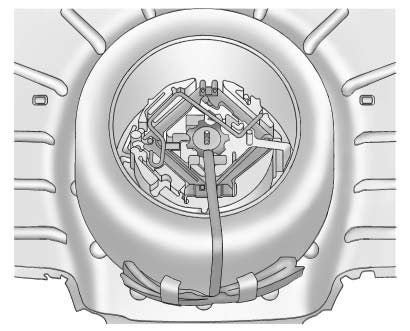
1. Retainer Nut.
2. Tool Bag Tether.
3. Tool Bag.
4. Spare Tire.
1. Open the trunk.
2. Lift the load floor.
3. Turn the retainer nut (1) counterclockwise to remove it.
Then remove the tool bag tether (2) from the stow rod, the tool bag (3) containing the wheel wrench and wheel blocks, and the spare tire (4).
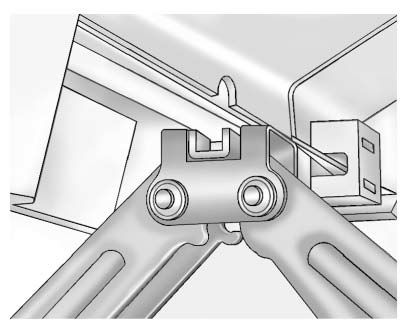
4. Remove the jack, jack handle extension, and two-piece wrench, if equipped.
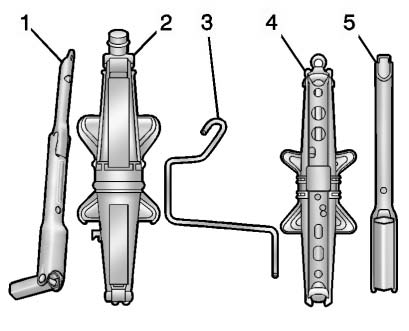
1. Three-Piece Wrench.
2. Hex Head Jack.
3. Jack Handle Extension.
4. Coin/Pierce Jack.
5. Two-Piece Wrench.
This vehicle may have one of the following: A coin/pierce jack (4), a jack handle extension (3), and a two-piece wrench (5), or a hex head jack (2) and three-piece wrench (1).
Removing the Flat Tire and Installing the Spare Tire
This vehicle may have aluminum wheels with exposed wheel nuts.
Use the wheel wrench to loosen all the wheel nuts. Do not remove them yet.
Or, this vehicle may have steel wheels with plastic covers.
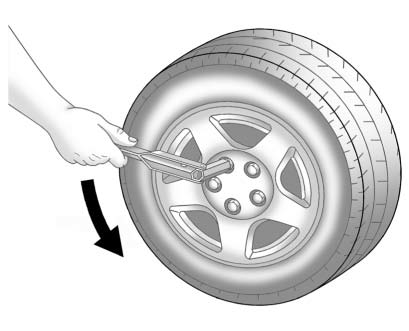
To remove the plastic covers and wheel nut caps, loosen the plastic nut caps with the wheel wrench in a counterclockwise direction.
If needed, finish loosening them with your fingers. The plastic nut caps will not come off.
If needed, use the flat end of the wheel wrench and pry along the edge of the cover until it comes off.
The edge of the wheel cover could be sharp, so do not try to remove it with your bare hands. Do not drop the cover or lay it face down, as it could become scratched or damaged. Store the wheel cover in the trunk until the flat tire is repaired or replaced.
Once you have removed the wheel cover, use the following procedure to remove the flat tire and install the spare tire.
1. Do a safety check before proceeding.
2. Turn the wheel wrench counterclockwise once on each wheel nut to loosen it. Do not remove them yet.
3. Place the jack near the flat tire.
4. Place the wheel blocks on both sides of the tire at the opposite corner of the tire being changed.

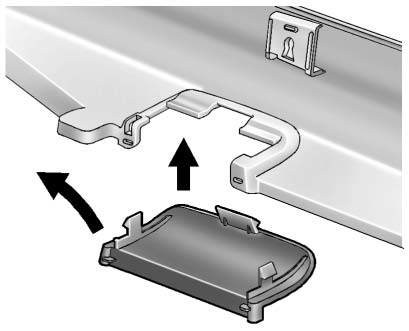
5. If this vehicle is the RS model, locate the front or rear jack cover on the rocker molding near the tire being changed.
Place your hand behind the edge of the cover on the rocker molding. Pull down and out to remove the cover.
The cover will remain attached to the molding by a tether.
6. Place the jack under the vehicle.
7. If you have a coin/pierce jack, attach the jack handle extension to the jack by sliding the hook through the end of the jack.
If you have a hex head jack, place the hex tube end of the wrench over the hex head of the jack.
Notice: Make sure that the jack lift head is in the correct position or you may damage your vehicle.
The repairs would not be covered by your warranty.
8. Position the jack lift head at the jack location nearest the flat tire.
The location is indicated by a notch in the flange. The jack must not be used in any other position.
WARNING
Getting under a vehicle when it is lifted on a jack is dangerous.
If the vehicle slips off the jack, you could be badly injured or killed. Never get under a vehicle when it is supported only by a jack.
WARNING
Raising the vehicle with the jack improperly positioned can damage the vehicle and even make the vehicle fall. To help avoid personal injury and vehicle damage, be sure to fit the jack lift head into the proper location before raising the vehicle.
WARNING
Lifting a vehicle and getting under it to do maintenance or repairs is dangerous without the appropriate safety equipment and training. If a jack is provided with the vehicle, it is designed only for changing a flat tire. If it is used for anything else, you or others could be badly injured or killed if the vehicle slips off the jack. If a jack is provided with the vehicle, only use it for changing a flat tire.
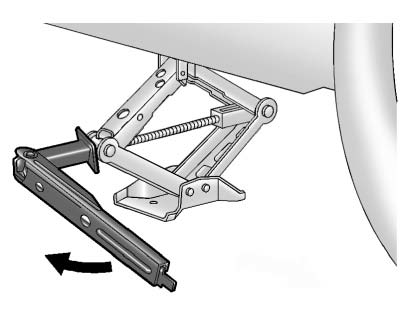
Hex Head Jack Shown, Coin/ Pierce Jack Similar
9. Raise the jack by turning the handle clockwise until it comes in contact with the notch in the flange.
Make sure the jack lift head notch is placed in the flange notch.
Raise the vehicle far enough off the ground so there is enough room for the road tire to clear the ground.
10. Remove all of the wheel nuts.
11. Remove the flat tire.
WARNING
Rust or dirt on a wheel, or on the parts to which it is fastened, can make wheel nuts become loose after time. The wheel could come off and cause an accident. When changing a wheel, remove any rust or dirt from places where the wheel attaches to the vehicle. In an emergency, a cloth or a paper towel can be used; however, use a scraper or wire brush later to remove all rust or dirt.
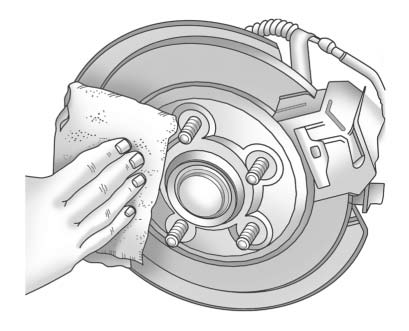
12. Remove any rust or dirt from the wheel bolts, mounting surfaces, and spare wheel.
13. Place the compact spare tire on the wheel-mounting surface.
WARNING
Never use oil or grease on bolts or nuts because the nuts might come loose. The vehicle's wheel could fall off, causing a crash.
14. Reinstall the wheel nuts.
Tighten each nut by hand until the wheel is held against the hub.
15. Lower the vehicle by turning the jack handle counterclockwise.
WARNING
Wheel nuts that are improperly or incorrectly tightened can cause the wheels to become loose or come off. The wheel nuts should be tightened with a torque wrench to the proper torque specification after replacing. Follow the torque specification supplied by the aftermarket manufacturer when using accessory locking wheel nuts.
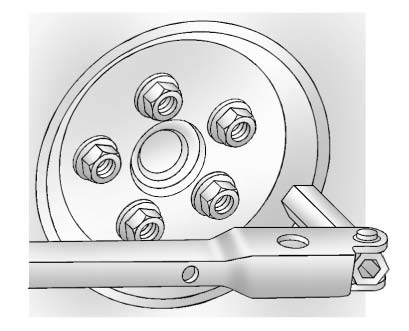
Notice: Improperly tightened wheel nuts can lead to brake pulsation and rotor damage. To avoid expensive brake repairs, evenly tighten the wheel nuts in the proper sequence and to the proper torque specification.
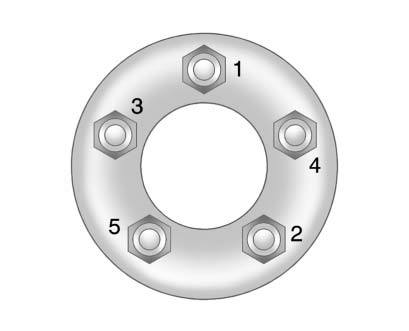
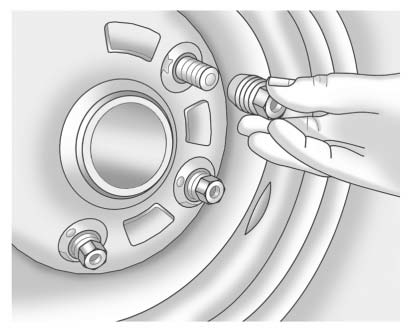
16. Tighten the wheel nuts firmly in a crisscross sequence, as shown.
17. Lower the jack all the way and remove the jack from under the vehicle.
18. Tighten the wheel nuts firmly with the wheel wrench.
Front Jack Cover Shown, Rear Jack Cover Similar
19. If this vehicle is the RS model, snap the jack cover back into place.
20. Remove the wheel blocks and return them to their proper storage location.
When reinstalling the wheel cover or center cap on the full-size tire, tighten all five plastic caps hand snug with the aid of the wheel wrench and tighten them with the wheel wrench an additional one-quarter of a turn.
Notice: Wheel covers will not fit on the vehicle's compact spare.
If you try to put a wheel cover on the compact spare, the cover or the spare could be damaged.
Storing a Flat or Spare Tire and Tools
WARNING
Storing a jack, a tire, or other equipment in the passenger compartment of the vehicle could cause injury. In a sudden stop or collision, loose equipment could strike someone. Store all these in the proper place.
Storing the Flat Tire and Tools
1. Replace the wheel wrench and wheel blocks in the tool bag.
2. Remove the foam container from the rear storage compartment.
Coin/Pierce Jack Shown, Hex Head Jack Similar
3. Place the flat tire in the storage compartment with the valve stem down.
4. Place the jack and jack handle extension, if the vehicle has one, in the foam container.
5. Place the foam container inside the flat tire. Align the hole with the stow rod.
6. Place the tool bag tether over the stow rod and the tool bag rear of the flat tire.
7. Turn the retainer nut clockwise until tight.
8. Replace the load floor.
The load floor may not lay flat.
The compact spare is for temporary use only. Replace the compact spare tire with a full-size tire as soon as you can.
Storing the Compact Spare Tire and Tools
Reverse the instructions for removing the spare tire and tools to store the compact spare tire.
 Storing the Tire Sealant and Compressor Kit
The tire sealant and compressor kit is located in the trunk, under the load floor,
behind an access panel.
To remove the kit:
1. Open the trunk.
2. Turn the left knob counterclockwise and the r ...
 Compact Spare Tire
WARNING
Driving with more than one compact spare tire at a time could result in loss
of braking and handling. This could lead to a crash and you or others could be injured.
Use only one compact s ...
Other materials:
Vehicle Data Recording and Privacy
The vehicle has a number of computers that record information about the vehicle’s
performance and how it is driven. For example, the vehicle uses computer modules
to monitor and control engine and transmission performance, to monitor the conditions
for airbag deployment and deploy them in a cr ...
Tire Sealant and Compressor Kit
WARNING
Idling a vehicle in an enclosed area with poor ventilation is dangerous. Engine
exhaust may enter the vehicle. Engine exhaust contains carbon monoxide (CO) which
cannot be seen or smelled.
It can cause unconsciousness and even death. Never run the engine in an enclosed
area that has ...
Cigarette Lighter
For vehicles with a cigarette lighter, it is on the center floor console near
the shift lever.
To activate the cigarette lighter, push it into the heating element and let go.
When the lighter is ready it will pop back out.
Notice: Holding a cigarette lighter in while it is heating does not
l ...
