Chevrolet Cruze Repair Manual: Horns
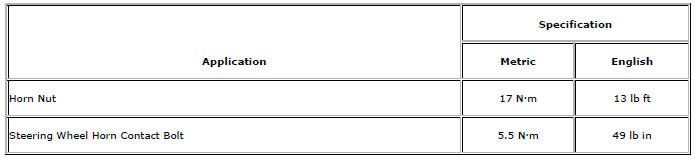
Specifications
Horn Replacement
Preliminary Procedure
Remove the front bumper fascia. Refer to Front Bumper Fascia Replacement.
- Horn Nut
Caution: Refer to Fastener Caution in the Preface section.
Tighten 17 N·m (13 lb ft)
- Horn
Tip Disconnect electrical connectors.
Steering Wheel Horn Contact Replacement
Preliminary Procedure
Remove inflatable restraint steering wheel module. Refer to Steering Wheel Inflatable Restraint Module Replacement.
- Steering Wheel Horn Contact Bolt (Qty: 3)
Caution: Refer to Fastener Caution in the Preface section.
Tighten 5.5 N·m (49 lb in)
- Steering Wheel Horn Contact
Tip
Disconnect the electrical connector.
Horn System Description and Operation
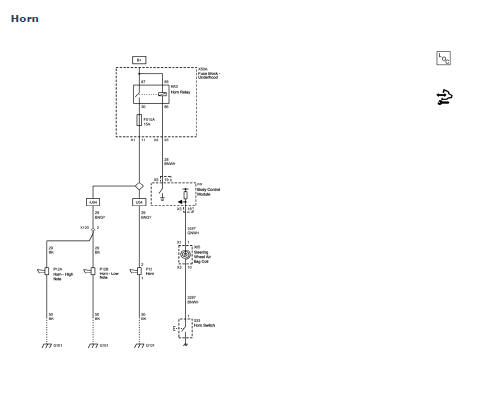
System Description
The horn system consists of the following components:
- F51UA 15A fuse
- Underhood fuse block (contains a non-serviceable PCB Horn relay)
- Horn switch
- Horn
- Body control module (BCM)
System Operation
The vehicle horn is activated whenever the horn switch is depressed.
The BCM commands the horns ON under any of the following conditions:
- When the content theft deterrent system detects a vehicle intrusion--For further information refer to Content Theft Deterrent (CTD) Description and Operation.
- When the keyless entry system is used to lock the vehicle, a horn chirp may sound to notify the driver that the vehicle has been locked. The notification feature may be enabled or disabled through personalization. For further information refer to Keyless Entry System Description and Operation.
Circuit Operation
The BCM controls the horn operation, when the horn switch is pressed, it closes a switch pulling the horn signal circuit low. When the BCM detects the drop in voltage in the horn switch signal circuit, it energizes the PCB Horn relay which provides B+ voltage to the horn control circuit, sounding the horn.
When the vehicle is in the Off Power Mode the BCM will attempt to detect a stuck or continuously activated horn switch. When enabled, activation of the horn will be limited to 10 seconds to protect the horn from excessive use.
 Rear Window Defogger Description and Operation
Rear Window Defogger System Components
The rear window defogger system consists of the following components:
HVAC Control Module
HVAC Control Head
Rear Window Defogger Relay
Rear Defogger G ...
 Lighting
Specifications
Headlights/Daytime Running Lights (DRL) Schematics
Interior Lights Schematics
...
Other materials:
Navigation System
If the vehicle has a navigation system, there is a separate navigation manual
that includes information on the radio, audio players, and navigation system.
The navigation system provides detailed maps of most major freeways and roads.
After a destination has been set, the system provides turn-b ...
Winter Tires
This vehicle was not, originally, equipped with winter tires. Winter tires are
designed for increased traction on snow and ice-covered roads. Consider installing
winter tires on the vehicle if frequent driving on snow or ice-covered roads is
expected. See your dealer for details regarding wint ...
Fuel Additives
To provide cleaner air, all gasolines in the United States are now required to
contain additives that help prevent engine and fuel system deposits from forming,
allowing the emission control system to work properly. In most cases, nothing should
have to be added to the fuel.
However, some gas ...
