Chevrolet Cruze Owners Manual: Overview
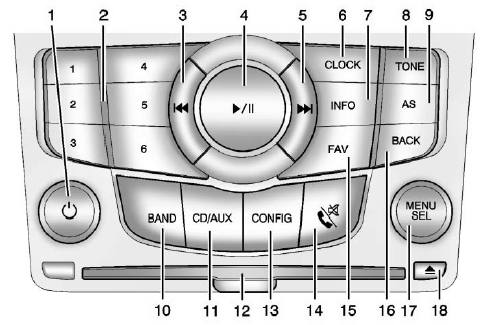
1.  • Turns the system on or off and adjusts the volume.
2. Buttons 1 to 6
• Radio: Saves and selects favorite stations.
3.  • Radio: Seeks the previous station.
• CD: Selects the previous track or rewinds within a track.
4.  • CD: Pauses playback, and stops playback.
5.  • Radio: Seeks the next station.
• CD: Selects the next track or fast forwards within a track.
6. CLOCK
• Opens the clock menu.
7. INFO
• Radio: Shows available information about the current station.
• CD: Shows available information about the current track.
8. TONE
• Opens the tone menu.
9. AS
• Radio: Opens the autostore stations list.
10. BAND
• Changes the band while listening to the radio.
• Selects the radio when listening to a different audio source.
11. CD/AUX
• Selects the CD player or an external audio source.
12. CD Slot
• Insert a CD.
13. CONFIG
• Opens the settings menu.
14.  • Opens the phone main menu.
• Mutes the audio system.
15. FAV
• Radio: Opens the favorites list.
16. BACK
• Menu: Moves one level back.
• Character Input: Deletes the last character.
17. MENU/SEL
• Turn to open menus, highlight menu items, or set numeric values while in a menu.
• Press to select menu items.
• Radio: Manually selects radio stations.
• CD: Selects tracks.
18.  • Removes a disc from the CD slot.
 Theft-Deterrent Feature
The theft-deterrent feature works by learning a portion of the Vehicle Identification
Number (VIN) to the infotainment system. The infotainment system does not operate
if it is stolen or moved to ...
 Operation
Controls
The infotainment system is operated by using the pushbuttons, multifunction knobs,
menus shown on the display, and steering wheel controls, if equipped.
Turning the System On or Off
(Vo ...
Other materials:
Outback Gets Turbo Boost and XT Badge Returns in Australia
Subaru Australia is giving the 2023 Outback a shot of adrenaline with the introduction of the turbocharged Outback XT. This new variant injects a much-needed dose of power into the popular wagon, addressing the loss of the 3.6-liter engine from the previous generation.
Under the hood of the car ...
Global Positioning System (GPS)
The position of the vehicle is determined by using satellite signals, various
vehicle signals, and map data.
At times, other interference such as the satellite condition, road configuration,
condition of the vehicle, and/or other circumstances can affect the navigation system's
ability to ...
Stitcher Internet Radio
Stitcher SmartRadio™ is an Internet radio service that streams news, sports,
and entertainment shows through the audio system. Create personalized, on-demand
stations or discover new shows through Stitcher's preset stations. To set up an
account, download the application from the Android M ...
