Chevrolet Cruze Repair Manual: Air Conditioning Compressor and Condenser Hose Replacement (1.6L LDE, LXV, and 1.8L 2H0)
Removal Procedure
- Recover the refrigerant. Refer to Refrigerant Recovery and Recharging
- Remove front bumper fascia. Refer to Front Bumper Fascia Replacement
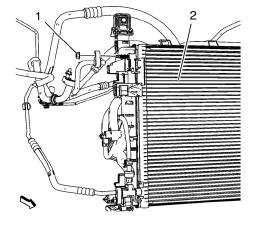
- Remove A/C compressor and condenser hose nut (1) from A/C condenser (2).
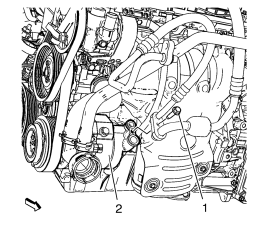
- Remove A/C compressor and condenser hose bolt (1) from A/C compressor (2).
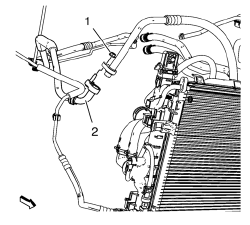
- Remove A/C compressor and condenser hose nut (1) from refrigerant hose (2).
- Remove A/C compressor and condenser hose.
Installation Procedure
Note: Use NEW O-ring seals. Refer to Air Conditioning O-Ring Seal Replacement
- Install A/C compressor and condenser hose.
Caution: Refer to Fastener Caution in the Preface section.
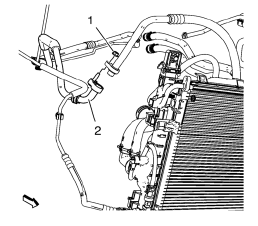
- Install A/C compressor and condenser hose nut (1) to refrigerant hose (2). Tighten nut to 19 N·m (14 lb ft).
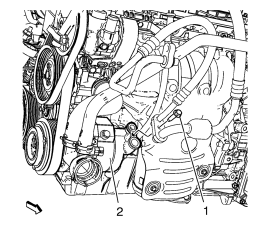
- Install A/C compressor and condenser hose bolt (1) to A/C compressor (2). Tighten bolt to 19 N·m (14 lb ft).
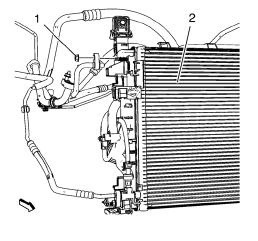
- Install A/C compressor and condenser hose nut (1) to A/C condenser (2). Tighten nut to 19 N·m (14 lb ft).
- Install front bumper fascia. Refer to Front Bumper Fascia Replacement
- Evacuate and charge the refrigerant system. Refer to Refrigerant Recovery and Recharging
 Air Conditioning Compressor and Condenser Hose Replacement (1.6L LXT)
Removal Procedure
Recover the refrigerant. Refer to Refrigerant Rec overy and
Recharging.
Remove front bumper fascia. Refer to Front Bumper Fascia Replacement.
Remove A/ ...
 Air Conditioning Evaporator Hose Assembly Replacement
Preliminary Procedures
Recover the refrigerant. Refer to Refrigerant Recovery and Recharging.
Remove the headlamp - right side. Refer to Headlamp Replacement.
Loosen power steering fluid r ...
Other materials:
Servicing the Airbag-Equipped Vehicle
Airbags affect how the vehicle should be serviced. There are parts of the airbag
system in several places around the vehicle. Your dealer and the service manual
have information about servicing the vehicle and the airbag system.
WARNING
For up to 10 seconds after the vehicle is turned off and ...
Repairs and Inspections Required After a Collision
Warning: Restraint systems can be damaged in a collision. To help
avoid injury and ensure that all parts in need of replacement are
replaced:
Replace any seat belt system that was in use during the
collision serious enough to deploy any automatic restraint device such as
air
bags and ...
Restraints
Specifications
Module Power, Ground, and MIL
Front Impact Sensor, Retractors, and Driver/Passenger Air
Bags
Side Impact Sensors and Side/Roof Air Bags
Air Bag Indicator and Disable Switch (C99)
...
