Chevrolet Cruze Repair Manual: Driver or Passenger Seat Side Inflatable Restraint Module Replacement
Warning: Refer to SIR Inflator Module Handling and Storage Warning in the Preface section.
Warning: Following the deployment of a side impact air bag, inspect the following parts for damage. Replace these parts if necessary:
- The seat cushion frame
- The seat recliner, if equipped
- The seat adjuster
- The seat back frame
Failure to do so may cause future personal injury.
Preliminary Procedure
Disable the SIR system. Refer to SIR Disabling and Enabling.
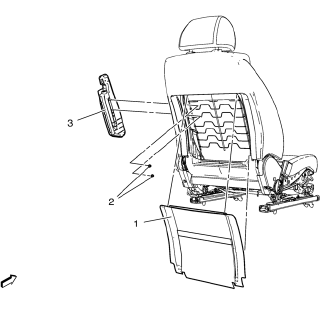
Front Seat Back Trim
Front Seat Side Inflatable Restraint Module Nut (Qty: 2)
Caution: Refer to Fastener Caution in the Preface section.
Tighten 4 N·m (36 lb in)
Front Seat Side Inflatable Restraint Module Assembly
Tip
Disconnect the electrical connector.
 Inflatable Restraint Steering Wheel Module Coil Centering
Caution: The new SIR coil assembly will be centered. Improper
alignment of the SIR coil assembly may damage the unit, causing an
inflatable restraint malfunction.
Verify the following condi ...
 Roof Side Rail Inflatable Restraint Module Replacement
Warning: In order to prevent SIR deployment, personal injury, or
unnecessary SIR system repairs, do not strike the door or the
door pillar in the area of the side impact sensor (SIS). Turn OFF ...
Other materials:
Lower Anchors and Tethers for Children (LATCH System)
The LATCH system secures a child restraint during driving or in a crash.
LATCH attachments on the child restraint are used to attach the child restraint
to the anchors in the vehicle. This system is designed to make installation of a
child restraint easier.
Make sure that a LATCH-compatible ch ...
Rear Side Door Window Replacement
Preliminary Procedures
Position the window approximately half way down in the door.
Remove the water deflector. Refer to Rear Side Door Water Deflector
Replacement.
Remove the outer sealing strip. Refer to Rear Side Door Window Outer
Sealing Strip Replacement.
Rear Side ...
Halogen Bulb Warning
Warning: Halogen bulbs contain gas under pressure. Handling a bulb
improperly could cause it to shatter into flying glass fragments. To
help avoid personal injury:
Turn off the lamp switch and allow the bulb to cool before changing
the bulb.
Leave the lamp switch OFF until the bulb chang ...
