Chevrolet Cruze Owners Manual: Engine Heater
The engine heater, if available, can help in cold weather conditions at or below −18°C (0°F) for easier starting and better fuel economy during engine warm-up. Plug in the heater at least four hours before starting the vehicle. An internal thermostat in the plug end of the cord will prevent engine heater operation at temperatures above −18°C (0°F).
To Use The Engine Heater
1. Turn off the engine.
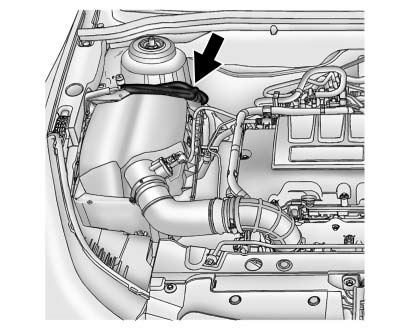
1.4L Engine Shown, 1.8L Similar
2. Open the hood and unwrap the electrical cord. The electrical cord is located on the passenger side of the engine compartment, behind the air cleaner.
3. Plug it into a normal, grounded 110-volt AC outlet.
WARNING
Plugging the cord into an ungrounded outlet could cause an electrical shock. Also, the wrong kind of extension cord could overheat and cause a fire. You could be seriously injured. Plug the cord into a properly grounded three-prong 110-volt AC outlet.
If the cord will not reach, use a heavy-duty three-prong extension cord rated for at least 15 amps
.
4. Before starting the engine, be sure to unplug and store the cord as it was before to keep it away from moving engine parts.
If you do not it could be damaged.
The length of time the heater should remain plugged in depends on several factors. Ask a dealer in the area where you will be parking the vehicle for the best advice on this.
 Starting the Engine
Place the transmission in the proper gear.
Notice: If you add electrical parts or accessories, you could change
the way the engine operates. Any resulting damage would not be covered by the vehicle ...
 Retained Accessory Power (RAP)
These vehicle accessories may be used for up to 10 minutes after the engine is
turned off:
• Audio System
• Power Windows
• Sunroof
The power windows and sunroof will continue to work for up to ...
Other materials:
Installation Procedure
Clean and prepare the attaching surfaces for brazing.
Apply structural adhesive to the attaching surfaces.
Position the rear bumper impact bar stud plate on the vehicle.
Verify the fit of the rear bumper impact bar stud plate
Clamp the rear bumper impact bar stud plate into ...
Installation Procedure
Remove the front wheelhouse rear panel brace (1) from service panel.
Create 6 x 20 mm (4/16 x 12/16 in) slots for MIG-brazing along the edges
of the front wheelhouse (1).
Clean and prepare the attaching surfaces for brazing.
Note: In MIG-brazing areas 50 mm (2 in) must b ...
Removal Procedure
Warning: Refer to Approved Equipment for Collision Repair Warning in
the Preface section.
Warning: Refer to Glass and Sheet Metal Handling Warning in the Preface
section.
Disable the SIR System. Refer to SIR Disabling and Enabling.
Disconnect the negative battery cable. Refer to Bat ...
