Chevrolet Cruze Repair Manual: Air Conditioning Compressor and Condenser Hose Replacement (1.6L LXT)
Removal Procedure
- Recover the refrigerant. Refer to Refrigerant Rec overy and Recharging.
- Remove front bumper fascia. Refer to Front Bumper Fascia Replacement.
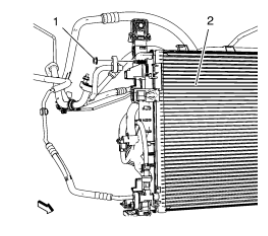
- Remove A/C compressor and condenser hose nut (1) from A/C condensor (2).
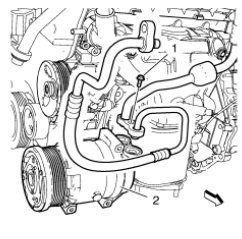
- Remove A/C compressor and condenser hose bolt (1) from A/C compressor (2).
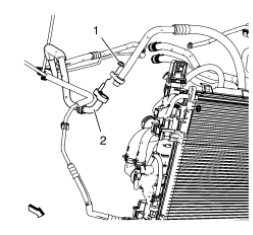
- Remove A/C compressor and condenser hose nut (1) from refrigerant hose (2).
- Remove A/C compressor and condenser hose.
Installation Procedure
Note: Use NEW O-ring seals. Refer to O-Ring Replacement.
- Install A/C compressor and condenser hose.
Caution: Refer to Fastener Caution in the Preface section.
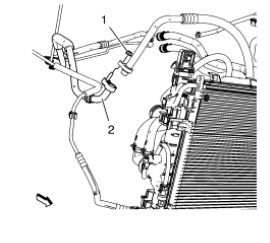
- Install A/C compressor and condenser hose nut (1) to refrigerant hose (2). Tighten nut to 19 N·m (14 lb ft).
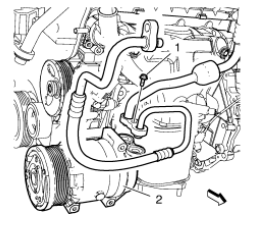
- Install A/C compressor and condenser hose bolt (1) to A/C compressor (2). Tighten bolt to 19 N·m (14 lb ft).
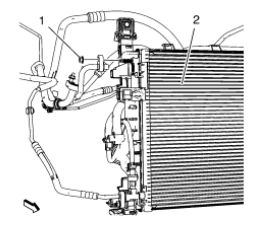
- Install air conditioning compressor and condenser hose nut (1) to A/C condenser (2). Tighten nut to 19 N·m (14 lb ft).
- Install front bumper fascia. Refer to Front Bumper Fascia Replacement.
- Evacuate and charge the refrigerant system. Refer to Refrigerant Recovery and Recharging.
 Air Conditioning Compressor Replacement (1.6L LXT)
Preliminary Procedures
Recover the refrigerant. Refer to Refrigerant Rec overy and
Recharging.
Remove drive belt. Refer to Generator and Air Conditioning Compressor
and Power Ste ...
 Air Conditioning Compressor and Condenser Hose Replacement (1.6L LDE, LXV,
and 1.8L 2H0)
Air Conditioning Compressor and Condenser Hose Replacement (1.6L LDE, LXV,
and 1.8L 2H0)
Removal Procedure
Recover the refrigerant. Refer to Refrigerant Recovery and Recharging
Remove front bumper fascia. Refer to Front Bumper Fascia Replacement
Remove A/C compressor and c ...
Other materials:
Relieving Fuel Pressure Warning
Warning: Remove the fuel tank cap and relieve the fuel system
pressure before servicing the fuel system in order to reduce the risk of
personal injury. After you relieve the fuel system pressure, a small amount of
fuel may be released when servicing the fuel lines, the fuel
injection pump, or ...
Installation Procedure
Cut the front hinge pillar body in corresponding locations to fit the
remaining original panel. The sectioning joint should be trimmed
to allow a gap of one-and-one-half-times the metal thickness at the
sectioning joint.
Create a 50 mm (2 in) backing plate from the unused portion of ...
Front Floor Console Storage Tray Replacement
Preliminary Procedure
Remove the automatic or manual transmission control lever trim cover. Refer
to Automatic or Manual Transmission Control Lever
Trim Cover Replacement
Front Floor Console Storage Tray Screw (Qty: 2)
Caution: Refer to Fastener Caution in the Preface section.
Tighte ...
