Chevrolet Cruze Repair Manual: Air Conditioning Compressor Replacement (1.6L LXT)
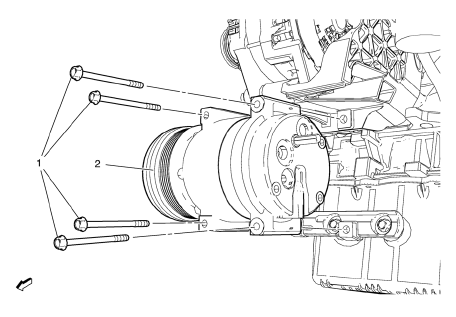
Preliminary Procedures
- Recover the refrigerant. Refer to Refrigerant Rec overy and Recharging.
- Remove drive belt. Refer to Generator and Air Conditioning Compressor and Power Steering Pump Belt Replacement.
- Raise and support the vehicle. Refer to Lifting and Jacking the Vehicle.
- Disconnect the A/C compressor electrical connector.
- Remove compressor hose assembly. Refer to Air Conditioning Compressor and Condenser Hose Replacement.
A/C Compressor Bolt (Qty: 4)
Caution: Refer to Fastener Caution in the Preface section.
Tip
The graphic shows the engine without attaching parts for better clarity.
Tighten
22 N·m (17 lb ft)
A/C Compressor Assembly
Procedure
- Use a low viscosity, polyalkylene glycol (PAG) oil. Use of the incorrect oil can result in compressor failure.
- When replacing the A/C compressor, balance the compressor oil. Refer to Air Conditioning Compressor Oil Balancing
- Using GE 39400 detector leak test A/C compressor fittings.
Special Tools
GE 39400 Electronic Halogen Leak Detector
 Air Conditioning Compressor Replacement (1.6L LDE, LXV, and 1.8L 2H0)
Preliminary Procedures
Recover the refrigerant. Refer to Refrigerant Rec . overy and
Recharging.
Remove drive belt. Refer to Drive Belt Replacement.
Raise and support the vehicle. ...
 Air Conditioning Compressor and Condenser Hose Replacement (1.6L LXT)
Removal Procedure
Recover the refrigerant. Refer to Refrigerant Rec overy and
Recharging.
Remove front bumper fascia. Refer to Front Bumper Fascia Replacement.
Remove A/ ...
Other materials:
Front Side Door Window Replacement
Preliminary Procedure
Position the window approximately half way down in the door.
Remove the water deflector. Refer to Front Side Door Water Deflector
Replacement.
Remove the outer sealing strip. Refer to Front Side Door Window Outer
Sealing Strip Replacement.
Fr ...
Vehicle Data Recording and Privacy
The vehicle has a number of computers that record information about the vehicle’s
performance and how it is driven. For example, the vehicle uses computer modules
to monitor and control engine and transmission performance, to monitor the conditions
for airbag deployment and deploy them in a cr ...
Front Side Door Wiring Harness Replacement
Preliminary Procedure
Remove the front side door inner panel trim. Refer to Front Side Door Trim
Replacement.
Front Side Door Wiring Harness
Warning: Unless directed otherwise, the ignition and start switch must be
in the OFF or LOCK position, and all electrical
loads must be OFF before ...
