Chevrolet Cruze Repair Manual: Backup Lamp Replacement
Preliminary Procedures
- Remove the rear compartment sill trim plate. Refer to Rear Compartment Sill Trim Plate Replacement.
- Disconnect the electrical harness connector from the backup lamp socket.
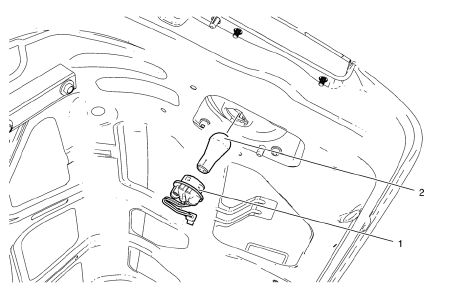
- Back Up Lamp Nut (Qty: 4)
Caution: Refer to Fastener Caution in the Preface section.
Tighten 5 N·m (44 lb ft)
- Back Up Lamp Assembly
Warning: Refer to Glass and Sheet Metal Handling Warning in the Preface section.
Warning: Refer to Halogen Bulb Warning in the Preface section.
Procedure
- Reach inside the rear compartment lid inner panel and remove the lower and upper retainer nuts securing the lamp assembly to the outer rear compartment lid panel.
- Push the inside edge of the lamp assembly outward from the rear outer compartment lid panel.
- Remove and transfer the bulb socket from the back up lamp assembly.
Backup Lamp Bulb Replacement
Warning: Refer to Glass and Sheet Metal Handling Warning in the Preface section.
Preliminary Procedure
Remove the rear compartment sill trim plate. Refer to Rear Compartment Sill Trim Plate Replacement.
- Back Up Lamp Socket
Tip
Rotate the lamp socket counterclockwise and remove from the tail lamp housing.
- Back Up Lamp Bulb
Warning: Refer to Halogen Bulb Warning in the Preface section.
Procedure
Remove the bulb from the lamp socket.
 Fog Lamp Aiming
Preparation Procedure
Important: Horizontal aim is not adjustable on this vehicle.
Vertical aim is done by an adjusting nut located on the rear of the fog lamp.
Prior to aiming the fog lamps, pe ...
 Forward Lamp Wiring Harness Replacement
Preliminary Procedures
Remove the front bumper. Refer to Front Bumper Fascia Replacement.
Remove the headlamp. Refer to Headlamp Replacement.
Using a scan tool, check for DTCs.
Forward ...
Other materials:
Specifications
Front Door (Diesel)
65 mm
83 mm
Front Door (Diesel)
60 mm
87 mm
Rear Compartment Lid (Diesel)
122 mm
32 mm
Rear Compartment Lid (Ecoline)
162 mm
32 mm
...
Radio Data System (RDS)
RDS features are available for use only on FM stations that broadcast RDS information.
With RDS, the radio can:
• Seek to stations broadcasting the selected type of programming.
• Receive announcements concerning local and national emergencies.
• Display messages from radio stations.
Thi ...
Front Bumper Fascia Replacement
Preliminary Procedure
Remove the front bumper fascia opening cover. Refer to Front Bumper Fascia
Opening Lower Cover Replacement.
Front Wheelhouse Liner Bolt (Qty: 8)
Caution: Refer to Fastener Caution in the Preface section.
Tighten
2.5 N·m(23 lb in)
Front Bumper Fascia Bolt (Q ...
