Chevrolet Cruze Repair Manual: Forward Lamp Wiring Harness Replacement
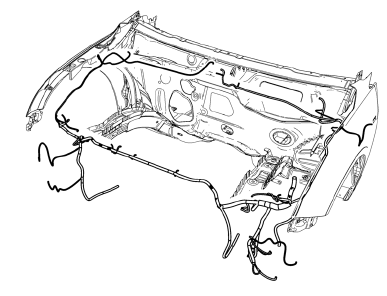
Preliminary Procedures
- Remove the front bumper. Refer to Front Bumper Fascia Replacement.
- Remove the headlamp. Refer to Headlamp Replacement.
- Using a scan tool, check for DTCs.
Forward Lamp Wiring Harness
Tip
- Create a work area large enough to lay out the new and old wiring harnesses.
- Use care when removing inaccessible harness retainers. Replacement retainers may not be available.
- Compare the new and old wiring harnesses for the same part number, the same number of wiring harness connectors, the same pin settings, and the same harness retainers.
- Follow a logical order of steps during the replacement to ensure proper installation of the harness.
Rear License Plate Lamp Replacement
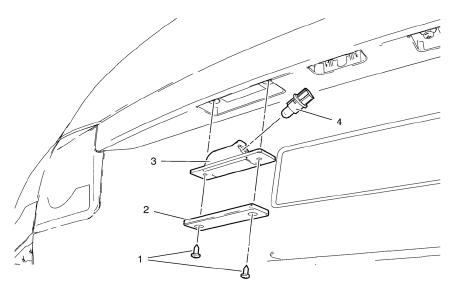
- Rear License Plate Lamp Screw (Qty: 2)
Caution: Refer to Fastener Caution in the Preface section.
Tighten 3 N·m (27 lb in)
- Rear License Plate Lamp
Tip
Rotate the left corner of the lamp assembly upward and pull the right side down out from the rear bumper fascia opening.
- Rear License Plate Lamp Socket
Tip
Rotate the lamp socket counterclockwise and remove.
- Rear License Plate Lamp Bulb
Tip
Service the bulb, as needed.
 Backup Lamp Replacement
Preliminary Procedures
Remove the rear compartment sill trim plate. Refer to Rear Compartment
Sill Trim Plate Replacement.
Disconnect the electrical harness connector from the backu ...
 Tail Lamp Replacement
Preliminary Procedures
Open and support the rear compartment
lid.
Remove the body side trim panel replacement in order to expose the tail
lamp pocket nuts. Refer to Body Side Tr ...
Other materials:
SIR System Description and Operation
SIR System Overview
The supplemental inflatable restraint (SIR) system supplements the protection
offered by the occupants Seat Belt System (2). The SIR
system may contain several inflator modules located throughout the vehicle, i.e.
steering wheel module (1), instrument panel module (1),
...
Air Vents
Adjustable air vents are in the center and on the side of the instrument panel.
Move the slats (1) to change the direction of the airflow.
Use the thumbwheels (2) near the air vents to open or close off the airflow.
Additional air vents are located beneath the windshield, driver and passenger
...
Driver or Passenger Seat Side Inflatable Restraint Module Replacement
Warning: Refer to SIR Inflator Module Handling and Storage Warning
in the Preface section.
Warning: Following the deployment of a side impact air bag, inspect the
following parts for damage. Replace these parts if
necessary:
The seat cushion frame
The seat recliner, if equipped
T ...
