Chevrolet Cruze Repair Manual: Tail Lamp Replacement
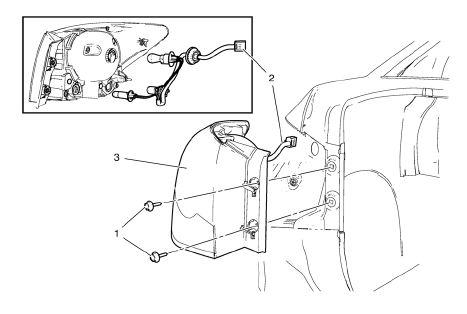
Preliminary Procedures
- Open and support the rear compartment lid.
- Remove the body side trim panel replacement in order to expose the tail lamp pocket nuts. Refer to Body Side Trim Panel Replacement - Left Side.
- Tail Lamp Bolt (Qty: 2)
Caution: Refer to Fastener Caution in the Preface section.
Tighten 2.5 N·m (22 lb ft)
- Tail Lamp Control Module with Bulb Assembly
Tip
Rotate the control module with bulbs counterclockwise and remove from the tail lamp housing.
- Tail Lamp Assembly
Warning: Refer to Halogen Bulb Warning in the Preface section.
Procedure
- Using a blunt tool, tap gently on the tail lamp studs before attempting to remove the tail lamp assembly from the lamp pocket.
- Pull the tail lamp assembly rearward.
- Disconnect the tail lamp control module with bulbs assembly electrical connector.
Tail Lamp Bulb Replacement
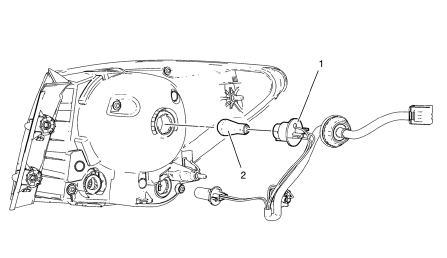
Preliminary Procedure
Remove the rear tail lamp assembly. Refer to Tail Lamp Replacement.
- Tail Lamp Bulb Harness Socket
Procedure
Rotate the bulb socket from the tail lamp housing.
- Tail Lamp Bulb
Procedure
Pull the bulb straight from the lamp harness socket
 Forward Lamp Wiring Harness Replacement
Preliminary Procedures
Remove the front bumper. Refer to Front Bumper Fascia Replacement.
Remove the headlamp. Refer to Headlamp Replacement.
Using a scan tool, check for DTCs.
Forward ...
 Exterior Lighting Systems Description and Operation
Exterior Lamps
The exterior lighting system consists of the following lamps if equipped:
Headlamps
Daytime Running Lamps (DRL)
Front fog lamps
Rear fog lamps
Park, tail and license lamps
...
Other materials:
Installation Procedure
Align the rear side door outer panel.
Verify the fit of the rear side door outer panel.
Clamp the rear side door outer panel
into position.
Pre-flanging the flange with BO-6396 pliers and BO-6392 tool kit .
Continue to hammer in stages along the hem flanges.
App ...
Fuel and Evaporative Emission Pipe Warning
Warning: In order to reduce the risk of fire and personal injury observe
the following items:
Replace all nylon fuel pipes that are nicked, scratched or damaged
during installation, do not attempt to repair the sections of the
nylon fuel pipes
Do not hammer directly on the fuel harness ...
Fuses and Circuit Breakers
The wiring circuits in the vehicle are protected from short circuits by a combination
of fuses and circuit breakers. This greatly reduces the chance of damage caused
by electrical problems.
To check a fuse, look at the silver-colored band inside the fuse.
If the band is broken or melted, repla ...
