Chevrolet Cruze Repair Manual: Instrument Panel Outer Air Outlet Duct Replacement

Preliminary Procedure
Remove instrument panel assembly. Refer to Instrument Panel Assembly Replacement.
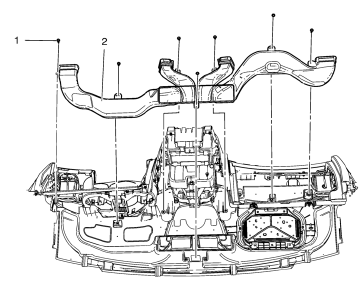
Instrument Panel Outer Air Outlet Duct Screw (Qty: 7)
Caution: Refer to Fastener Caution in the Preface section.
Tighten 2.5 N·m (22 lb in)
Instrument Panel Outer Air Outlet Duct
Floor Air Outlet Duct Replacement - Left Side (Right Hand Drive)

Preliminary Procedure
Remove IP Compartment. Refer to Instrument Panel Compartment Replacement.
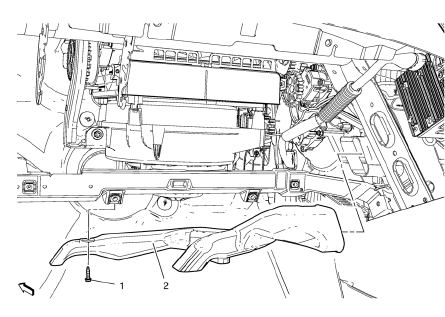
Floor Air Outlet Duct Bolt
Caution: Refer to Fastener Caution in the Preface section.
Tighten 2.5 N·m (22 lbf in)
Floor Air Outlet Duct
 Floor Air Outlet Replacement
Removal Procedure
Remove the instrument panel assembly. Refer to Instrument Panel
Assembly Replacement.
Remove the instrument panel wiring harness (2) from the instrument panel ...
 Floor Air Outlet Duct Replacement - Right Side (Right Hand Drive)
Removal Procedure
Remove instrument outer trim cover -- right side. Refer to Instrument
Panel Outer Trim Cover Replacement - Right Side.
Remove instrument panel lower trim pad cov ...
Other materials:
Air Vents
Adjustable air vents are in the center and on the side of the instrument panel.
Move the slats (1) to change the direction of the airflow.
Use the thumbwheels (2) near the air vents to open or close off the airflow.
Additional air vents are located beneath the windshield, driver and passenger
...
Rear Side Door Check Replacement
Preliminary Procedure
Remove rear side door trim panel. Refer to Rear Side Door
Trim Replacement
Remove the rear side door water deflector. Refer to Rear Side Door Water
Deflector Replacement
Rear Side Door Check Bolt
Caution: Refer to Fastener Caution in the Pre ...
Installation Procedure
Create 5 x 18 mm (4/16 x 11/16 in) slots for MIG-brazing along the edges
of the tail lamp pocket as noted f rom the
original panel.
Note:
Clean and prepare the attaching surfaces for brazing.
Position the tail lamp pocket on the vehicle.
Verify the fit of the ta ...
