
Chevrolet Cruze Infotainment System: OnStar® Destination Download
The destination download lets an OnStar® subscriber ask an OnStar Advisor to download a destination to the navigation system. OnStar will send address information and location coordinates of the destination into the navigation system.
Using Destination Download
If the navigation radio screen is turned off before a download, the system automatically turns the screen on and displays a download confirmation message. The radio remains on after the download.
The navigation system displays “Please wait” as the address is searched within the map database.
If the address is not found within the map database, the system may use latitude and longitude coordinates to locate the destination.
If the system is unable to locate the address, the Destination Not Found screen displays.
Route Guidance Not Active
If an OnStar destination is downloaded while route guidance is not active, the navigation system displays a pop-up screen with the following screen functions:
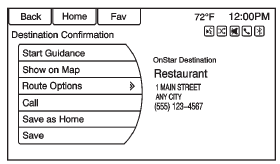
Start Guidance:
Press to start route calculation to the destination(s) received.
Show on Map
: Press to display the Map Screen.
Call
: Press to initiate a call with Bluetooth Phone (if available) or OnStar Hands-Free Calling.
Save as Home:
Press to set an address as a home destination.
Save: Press to save the downloaded destination to the address book.
Route Guidance Active
If an OnStar destination is downloaded while route guidance is already active, the system displays a pop-up screen with the following screen function: • Press Start Guidance; the navigation system adds the downloaded destination before the next waypoint of the existing route (closest to the current vehicle position).
• All other buttons on the pop-up screen operate as described under “Route Guidance Not Active.”
Previous Destinations
Previously downloaded OnStar destinations are saved under Previous Destinations in the navigation system, where they can be accessed or saved to the Address Book.
 Destination
If route guidance is not active, press the Destination Entry screen button on
the Home Page to access the Destination Entry screen. Several options can be selected
to plan a route by entering de ...
 Configure Menu
The Configuration Menu is used to adjust features and preferences, such as Sound,
Radio, Nav (Navigation), Display, or Time Settings.
1. Press the Config screen button on the Home Page.
2. Tou ...
Other materials:
Inflatable Restraint Roof Rail Modules
The roof rail modules are located under the headliner extending from the
front windshield pillar to the rear window pillar. The roof rail
modules contain a housing, inflatable air bag, initiating device, and a canister
of gas generating material. The initiator is part of the roof
rail module d ...
Front Side Door Adjustment
Preliminary Procedure
Remove the front wheelhouse liner. Refer to Front Wheelhouse Liner
Replacement.
Front Side Door
Caution: Refer to Fastener Caution in the Preface section.
Procedure
Loosen the front side door hinge bolt (Qty: 4) to adjust the front
side door.
Adjust the ...
SIR Inflator Module Handling and Storage Warning
Warning: When carrying an undeployed inflator module:
Do not carry the inflator module by the wires or connector.
Make sure the air bag opening points away from you.
When storing an undeployed inflator module:
Make sure the air bag opening points away from the surface on which
the in ...
