Chevrolet Cruze Repair Manual: Rear Compartment Lid Emblem/Nameplate Replacement (Rear Emblem)
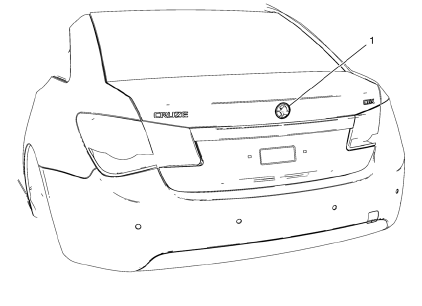
Rear Compartment Lid Emblem Assembly
Caution: Refer to Exterior Trim Emblem Removal Caution in the Preface section.
Procedure
- The part and surface should be 21°C (70°F) prior to installation. The vehicle should remain 21°C (70°F) for one hour after assembly to allow adhesive to develop sufficient bond strength.
- Use a Heat Gun or equivalent to remove the old nameplate. Clean all adhesive from the rear compartment panel and wipe the surface dry with a clean lint-free towel prior to installing the new nameplate
- When removing protective liners from the adhesive tape, be careful not to touch tape with hands and do not allow tape to come in contact with dirt or any foreign matter prior to adhesion.
- Close the rear compartment lid prior to adhesion.
- Using the palm of the hand, wet out the emblem to the rear compartment lid to ensure full adhesion of the emblem is made.
 Rear Compartment Lid Emblem/Nameplate Replacement (Cruze - Left Side)
Rear Compartment Lid Emblem Assembly
Caution: Refer to Exterior Trim Emblem Removal Caution in the Preface
section.
Procedure
The part and surface should be 21°C (70°F) prior to installati ...
 Rear Compartment Lid Emblem/Nameplate Replacement (LT or LTZ)
Rear Compartment Lid Emblem Assembly
Caution: Refer to Exterior Trim Emblem Removal Caution in the
Preface section.
Procedure
The part and surface should be 21°C (70°F) prior to installati ...
Other materials:
Headlining Trim Panel Replacement (Without Sunroof)
Warning: Do not attempt to repair or alter the head impact
energy-absorbing material glued to the headliner or to the garnish
trims. If the material is damaged, replace the headliner and/or the garnish
trim. Failure to do so could result in personal injury.
Caution: If a vehicle is equip ...
Installation Procedure
Remove the front wheelhouse rear panel brace (1) from service panel.
Drill 8 mm (5/16 in) for plug welding instead of the adhesive noted from
the front area of the original panel.
Note: Double the number of drills at the flange where front
wheelhouse panel and front comp ...
Checking and Adding Power Steering Fluid
Caution: When adding fluid or making a complete fluid change, always
use the proper power steering fluid. Failure to use the proper fluid
will cause hose and seal damage and fluid leaks.
Clean the area surrounding the reservoir cap.
Remove the reservoir cap.
Inspect the power steeri ...
