Chevrolet Cruze Repair Manual: Rear Spring Insulator Replacement
Removal Procedure
- Raise and suitably support the vehicle. Refer to Lifting and Jacking the Vehicle.
- Support the rear axle with a tall jack stand near the shock absorber.
- Remove the lower shock bolt. Refer to Shock Absorber Replacement.
- Using the tall jack stands, slowly lower the rear axle in order to remove tension from the rear springs.
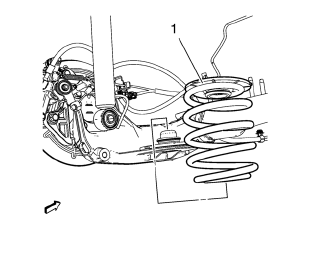
- Remove the spring (1).
- Remove the lower and upper rear spring insulators (1, 2).
Installation Procedure
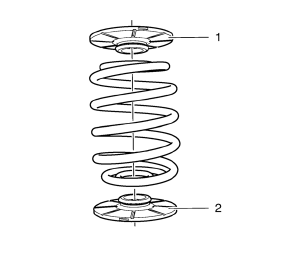
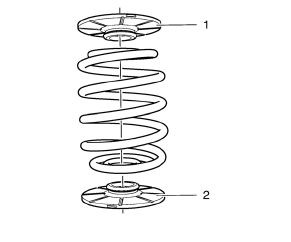
Note: The rear springs are indexed with the colored tag toward the rear of the vehicle. No up/down or side to side orientation is required.
- Install the lower and upper rear spring insulators (1, 2).
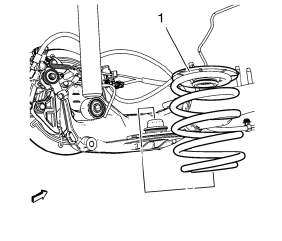
- Install the spring (1) with the spring tag toward the rear of the vehicle, making sure the lower rear is seated into the lower spring seat.
- Using the jack stands, raise the rear axle in order to compress the rear springs.
- Install the lower shock absorber bolts. Refer to Shock Absorber Replacement.
- Lower the vehicle.
 Shock Absorber Disposal
Warning: Gas charged shock absorbers contain high pressure gas. Do
not remove the snap ring from inside the top of the tube. If the snap
ring is removed, the contents of the shock absorber will com ...
 Rear Spring Replacement
Removal Procedure
Raise and suitably support the vehicle. Refer to Lifting and Jacking the
Vehicle.
Support the rear axle with a tall jack stand near the shock absorber.
Remove the lower sh ...
Other materials:
Shifting out of Park
This vehicle is equipped with an automatic transmission shift lock control system.
The shift lock is designed to:
• Prevent ignition key removal unless the shift lever is in P (Park) with the shift
lever button fully released.
• Prevent movement of the shift lever out of P (Park) unless the ig ...
Installation Procedure
Prepare all mating surfaces as necessary.
Align the front hinge pillar body reinforcement.
Drill 8 mm (5/16 in) for plug welding along the edges of the front hinge
pillar body as noted from the original
panel.
Clean and prepare the attaching surfaces for welding.
...
Front Wheel Drive Shaft Replacement - Right Side
Special Tools
CH-313 Slide Hammer
CH-6003 Axle Shaft Remover
CH-49376 Holding Wrench
CH-49400 Hub Spindle Remover
DT-6332 Seal Protector
EN-956-1 Extension
For equivalent regional tools, refer to Special Tools.
Removal Procedure
Warning: To prevent personal injury and/or component ...
