Chevrolet Cruze Repair Manual: Rear Wheel Bearing and Hub Replacement (Drum Brake)
Special Tools
EN 45059 Torque Angle Sensor Kit
For equivalent regional tools, refer to Special Tools.
Removal Procedure
- Raise and suitably support the vehicle. Refer to Lifting and Jacking the Vehicle.
- Remove the tire and wheel assembly. Refer to Tire and Wheel Removal and Installation.
- Remove the brake drum. Refer to Brake Drum Replacement.
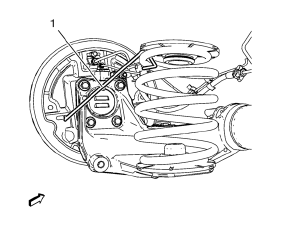
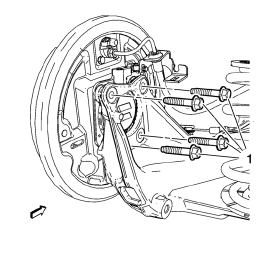
- Remove the plug from the drum brake actuator access hole in the backing plate. Using the access hole, install a heavy mechanic wire (1) in order to support the brake backing plate.
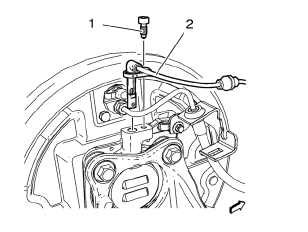
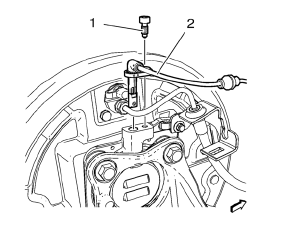
- Remove the wheel speed sensor bolt (2).
- Remove the wheel speed sensor (1).
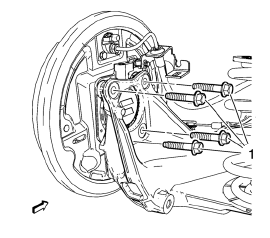
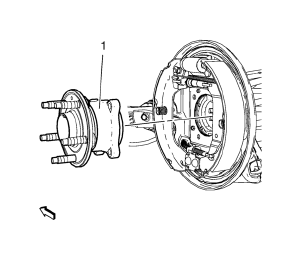
- Remove the wheel bearing/hub mounting bolts (1).
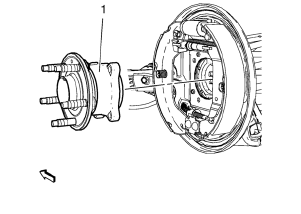
- Remove the wheel bearing/hub assembly (1) from the rear axle assembly and brake backing plate.
Installation Procedure
- Install the wheel bearing/hub assembly (1) to the brake backing plate and the rear axle assembly.
Caution: Refer to Fastener Caution in the Preface section.
Note: Tighten the bolts evenly, in a cross-pattern.
- Install the wheel bearing/hub mounting bolts (1) and tighten to 50 N·m
(37 lb ft) + 40° , using the EN 45059 kit.
Tighten the bolts evenly, in a cross-pattern.
- Install the wheel speed sensor (1).
- Install the wheel speed sensor bolt (2) and tighten to 6 N·m (54 lb in).
- Remove the support (1) from the brake backing plate.
- Install the plug to the drum brake actuator access hole in the backing plate.
- Install the brake drum. Refer to Brake Drum Replacement.
- Install the tire and wheel assembly. Refer to Tire and Wheel Removal and Installation.
- Remove the support and lower the vehicle.
 Rear Wheel Bearing and Hub Replacement (Disc Brake)
Special Tools
EN 45059 Torque Angle Sensor Kit
For equivalent regional tools, refer to Special Tools.
Removal Procedure
Raise and suitably support the vehicle. Refer to Lifting and ...
 Rear Axle Bushing Replacement
Special Tools
CH 6616 Hydraulic Hand Pump
CH 6615-10 Hydraulic Cylinder
CH-48377-1 Chisel
CH-49233 Adapter
CH 906-42 Adapter
For equivalent regional tools. Refer to Special Tools
Remov ...
Other materials:
Shifting Into Park
Use this procedure to shift into P (Park):
1. Hold the brake pedal down and set the parking brake.
2. Hold the button on the shift lever and push the lever toward the front of the
vehicle into P (Park).
3. Turn the ignition to LOCK/OFF.
Leaving the Vehicle with the Engine Running
WARNING
It ...
Replacing Airbag System Parts after a Crash
WARNING
A crash can damage the airbag systems in the vehicle.
A damaged airbag system may not work properly and may not protect you and your
passenger(s) in a crash, resulting in serious injury or even death. To help make
sure the airbag systems are working properly after a crash, have them in ...
General Information
Your vehicle is an important investment. This section describes the required
maintenance for the vehicle. Follow this schedule to help protect against major
repair expenses resulting from neglect or inadequate maintenance. It may also help
to maintain the value of the vehicle if it is sold. It ...
