
Chevrolet Cruze Repair Manual: Removal Procedure
- Raise and support the vehicle. Refer to Lifting and Jacking the Vehicle.
- Remove the brake rotor. Refer to Front Brake Rotor Replacement.
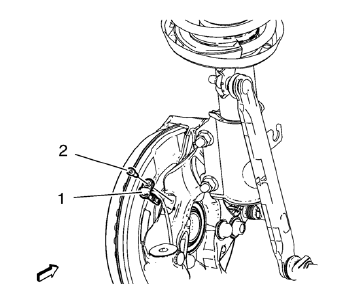
- Remove the wheel speed sensor screw (2).
- Remove the wheel speed sensor (1) from the steering knuckle.
- Remove the wheel drive shaft from the front wheel bearing/hub. Refer to front wheel drive shaft replacement Front Wheel Drive Shaft Replacement - Left Side and/or Front Wheel Drive Shaft Replacement - Right Side.
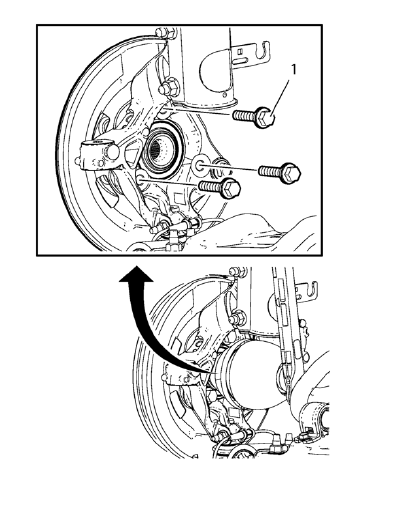
- Remove and discard the front wheel bearing/hub bolts (1).
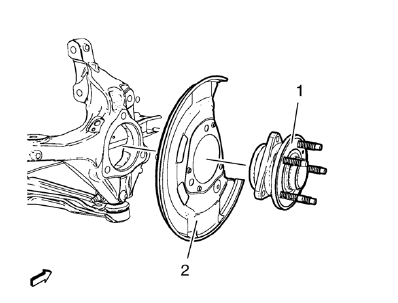
- Remove the front wheel bearing/hub (1) and front brake shield (2) from the steering knuckle.
 Front Wheel Bearing and Hub Replacement
Special Tools
EN-45059 Torque Angle Sensor Kit
For equivalent regional tools, refer to Special Tools. ...
 Installation Procedure
Position the front brake shield (2) and front wheel bearing/hub (1)
assembly in the steering knuckle.
Caution: Refer to Fastener Caution in the Preface section.
Install the NEW fr ...
Other materials:
Bluetooth Audio
If equipped, music may be played from a paired Bluetooth device.
To play music through a Bluetooth device:
1. Power on the device, pair, and connect the device.
2. Music can be launched by doing one of the following:
• Press the Bluetooth Audio screen button on the Home Page.
• Press SOURCE or ...
Traction Control System (TCS)
The traction control system limits wheel spin. The system is on when the vehicle
is started.
• To turn off traction control, press and release
on the center console.
illuminates in the instrument cluster.
• Press and release again to turn traction
control back on. ...
Seat Belt Latch Stop Installation
Preliminary Procedure
Locate the hole in the seat belt webbing where the original seat belt
stop button was located.
If the original hole in the seat belt webbing is not visible, perform
the following:
If either the right or left stop button is missing use the opposing seat
...
