
Chevrolet Cruze Owners Manual: Turn and Lane-Change Signals
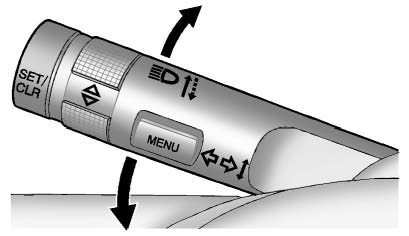
Move the lever all the way up or down to signal a turn.
An arrow on the instrument cluster will flash in the direction of the turn or lane change.
Raise or lower the lever until the arrow starts to flash to signal a lane change. The turn signal flashes three times.
The lever returns to its starting position when it is released.
If after signaling a turn or lane change the arrow flashes rapidly or does not come on, a signal bulb may be burned out. Replace any burned out bulbs. If a bulb is not burned out, check the fuse.
 Hazard Warning Flashers
(Hazard Warning Flasher):
Press and momentarily hold this button on the instrument panel above the climate
control system, to make the front and rear turn signal lamps flash on and off. This
...
 Front Fog Lamps
For vehicles with front fog lamps, the button is on the outboard side of the
instrument panel.
The ignition must be on to turn on the fog lamps.
(Front Fog Lamps): Press
to turn the fog lamps ...
Other materials:
Rear Side Door Stationary Window Replacement
Preliminary Procedures
Remove the rear side door trim panel. Refer to Rear Side Door Trim
Replacement.
Remove the rear side water deflector. Refer to Rear Side Door Water
Deflector Replacement.
Remove the rear door window outer sealing strip. Refer to Rear Side Door
Window ...
Refrigerant Recovery and Recharging
Special Tools
GE-45037 A/C Oil Injector
For equivalent regional tools, refer to Special Tools.
Refrigerant Recovery and Recharging
Warning: To prevent personal injury, avoid breathing A/C Refrigerant
and lubricant vapor or mist. Work in a well ventilated area. To
remove refrigerant from the A ...
Inflatable Restraint Steering Wheel Module Coil Centering
Caution: The new SIR coil assembly will be centered. Improper
alignment of the SIR coil assembly may damage the unit, causing an
inflatable restraint malfunction.
Verify the following conditions before centering the supplemental
inflatable restraint (SIR) steering wheel module co ...
