Chevrolet Cruze Infotainment System: Using the Navigation System
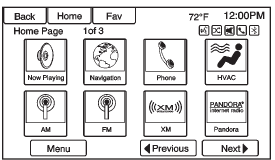
Use the NAV button on the faceplate or Home Page to access the navigation map.
Press the NAV button again to change between alternative views of the normal split and full map views.
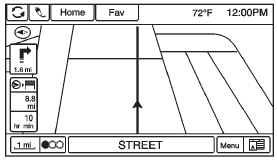
The Menu screen button at the bottom right side of the display accesses the Navigation Menu.
The touch-sensitive buttons available are:
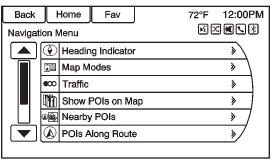
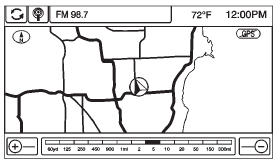
Heading Indicator
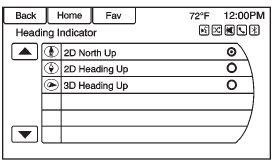
Press Heading Indicator to display the Map View. There are three indicator settings: • 2D North Up: Displays North at the top of the map screen regardless of the direction the vehicle is traveling.
• 2D Heading Up: Displays the direction the vehicle is traveling.
The shaded triangle icon points North.
• 3D Heading Up: Is the same as 2D Heading Up, but the map is in 3D.
Map Modes
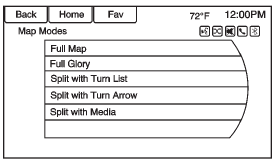
Press to change the view of the maps while using the navigation function. The system offers a variety of full and split views. Some views are only selectable when route guidance is active.

An alternative method to change the view of the maps would be to press the map mode icon.
Traffic
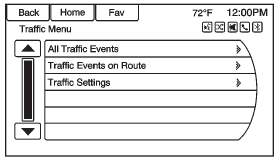
Press Traffic to display the Traffic Menu. Press the desired option.
Options available are: • All Traffic Events: Press to view all reported traffic events while on or off a planned route.
• Traffic Events on Route: Press to view traffic events while on a planned route.
• Traffic Settings: Press to customize traffic options. This feature can also be accessed by pressing the traffic light screen button displayed at the left lower side of the map screen.
POIs Nearby
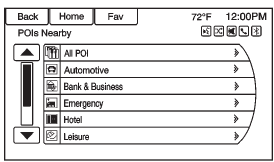
Press to display a search list of nearby POIs. Select the desired POI.
POIs Along Route
Press to display a search list of POIs that lie along or near the route to the destination. Select the desired POI.
Show POIs on Map
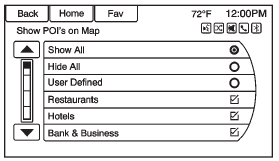
Press to customize which major POI categories are displayed on the map.
Switch Route Time/Destination
Press to customize the Arrival/ Travel time and Waypoint/ Destination information displayed in the main map screen.
Current Position Information
Press to display a split screen showing detailed information about the vehicle position. This feature can also be accessed by pressing the vehicle information tab on the lower center of the display. The location can be saved to the Address Book by pressing Save in the split screen.
Destination Information
Press to display a split map screen showing the next waypoint/ destination. The location can be saved to the Address Book by pressing Save in the split screen.
Map Adjustments
The system lets you adjust the scale of view on the map. Also, as you drive, the map scrolls automatically based on the direction of travel.
Map Scales
There are two methods to change the map scale: • Turn the MENU/SEL or MENU knob clockwise or counterclockwise to zoom out or in.
• Press the Map Scale + or − button on the bottom corners of the map screen to change the zoom level.
The map scale bar times out if the zoom level is not changed within a few seconds.
The scale can be configured for English or metric units. To change from English to metric, see “Driver Information Center (DIC)” in the owner manual.
Scroll Features

• To scroll within the map, touch anywhere on the map screen and the scroll symbol displays.
• Tap the map to center at that location on the screen.
• Press and hold the screen in any direction outside the scroll symbol to scroll the map in that direction.
• Scroll speed increases when touching closer to the edge of the screen.
• Press NAV on the faceplate to exit map scrolling and return to the current vehicle location on the map.

Press the cycling arrows located at the top of the map screen to toggle from the normal top bar (Home and Fav) to the audio information bar.
 Navigation
...
 Maps
Maps
This section includes basic information about the map database.
The data is stored in the internal flash memory that is used in the navigation
system.
Detailed Areas
Road network attributes are c ...
Other materials:
Compact Spare Tire
WARNING
Driving with more than one compact spare tire at a time could result in loss
of braking and handling. This could lead to a crash and you or others could be injured.
Use only one compact spare tire at a time.
If this vehicle has a compact spare tire, it was fully inflated when new; howe ...
Park Brake and P (Park) Mechanism Check
WARNING
When you are doing this check, the vehicle could begin to move.
You or others could be injured and property could be damaged.
Make sure there is room in front of the vehicle in case it begins to roll. Be
ready to apply the regular brake at once should the vehicle begin to move.
Park on ...
Auxiliary Devices
If equipped, the AUX inputs are in the center console and allows portable devices
to connect to the vehicle using the 3.5 mm(1/8 in) auxiliary jack or USB port.
3.5mm Jack
Connect a 3.5mm (1/8 in) cable to the auxiliary input jack to use a portable
audio player.
Playback of an audio device th ...
