Chevrolet Cruze Repair Manual: Air Conditioning Compressor Replacement (1.6L LDE, LXV, and 1.8L 2H0)

Preliminary Procedures
- Recover the refrigerant. Refer to Refrigerant Rec . overy and Recharging.
- Remove drive belt. Refer to Drive Belt Replacement.
- Raise and support the vehicle. Refer to Lifting and Jacking the Vehicle.
- Disconnect the A/C compressor electrical connector
- Remove compressor hose assembly. Refer to Air Conditioning Compressor and Condenser Hose Replacement.
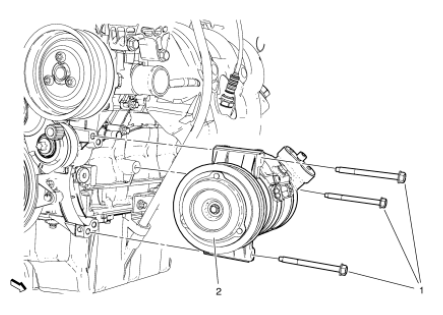
- A/C Compressor Bolt (Qty: 3)
Caution: Refer to Fastener Caution in the Preface section.
Tighten 22 N·m (16 lbf ft)
- A/C Compressor Assembly
Procedure
- Use a low viscosity, poly-alkylene glycol (PAG) oil. Use of the incorrect oil can result in compressor failure.
- When replacing the A/C compressor, balance the compressor oil. Refer to Air Conditioning Compressor Oil Balancing
- Using GE 39400-A detector leak test A/C compressor fittings.
Special Tools
GE 39400-A Electronic Halogen Leak Detector
For equivalent regional tools, refer to Special Tools.
 Refrigerant Recovery and Recharging
Special Tools
GE-45037 A/C Oil Injector
For equivalent regional tools, refer to Special Tools.
Refrigerant Recovery and Recharging
Warning: To prevent personal injury, avoid breathing A/C Refriger ...
 Air Conditioning Compressor Replacement (1.6L LXT)
Preliminary Procedures
Recover the refrigerant. Refer to Refrigerant Rec overy and
Recharging.
Remove drive belt. Refer to Generator and Air Conditioning Compressor
and Power Ste ...
Other materials:
Moveable Window Schematics
Defogger Schematics
Window System Component Views
Window Systems Component Views
...
Deployment Outside Vehicle - Steering Wheel Module, Instrument Panel
Module, and Roof Rail Module
Deploy the inflator module outside of the vehicle when the vehicle will be
returned to service. Situations that require deployment outside
of the vehicle include the following:
Using the SIR diagnostics, you determine that the inflator module is
malfunctioning
The inflator module is cosm ...
Vehicle, Engine and Transmission ID and VIN Location, Derivative and Usage
Note:: Graphic shows exemplary VIN.
The VIN plate is the legal identifier of the vehicle. The VIN plate is
located on the upper left corner of the instrument panel (I/P) and can
be seen through the windshield from the outside of the vehicle:
...
