Chevrolet Cruze Repair Manual: Air Conditioning Compressor Replacement (1.6L LXT)
Preliminary Procedures
- Recover the refrigerant. Refer to Refrigerant Rec overy and Recharging.
- Remove drive belt. Refer to Generator and Air Conditioning Compressor and Power Steering Pump Belt Replacement.
- Raise and support the vehicle. Refer to Lifting and Jacking the Vehicle.
- Disconnect the A/C compressor electrical connector.
- Remove compressor hose assembly. Refer to Air Conditioning Compressor and Condenser Hose Replacement.
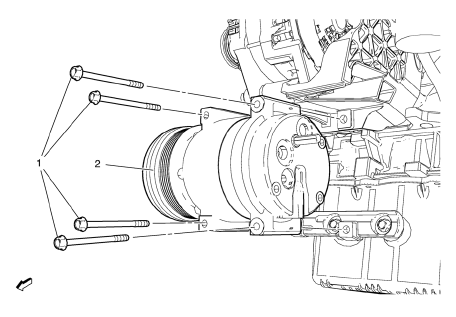
A/C Compressor Bolt (Qty: 4)
Caution: Refer to Fastener Caution in the Preface section.
Tip
The graphic shows the engine without attaching parts for better clarity.
Tighten
22 N·m (17 lb ft)
A/C Compressor Assembly
Procedure
- Use a low viscosity, polyalkylene glycol (PAG) oil. Use of the incorrect oil can result in compressor failure.
- When replacing the A/C compressor, balance the compressor oil. Refer to Air Conditioning Compressor Oil Balancing
- Using GE 39400 detector leak test A/C compressor fittings.
Special Tools
GE 39400 Electronic Halogen Leak Detector
 Air Conditioning Compressor Replacement (1.6L LDE, LXV, and 1.8L 2H0)
Preliminary Procedures
Recover the refrigerant. Refer to Refrigerant Rec . overy and
Recharging.
Remove drive belt. Refer to Drive Belt Replacement.
Raise and support the vehicle. ...
 Air Conditioning Compressor and Condenser Hose Replacement (1.6L LXT)
Removal Procedure
Recover the refrigerant. Refer to Refrigerant Rec overy and
Recharging.
Remove front bumper fascia. Refer to Front Bumper Fascia Replacement.
Remove A/ ...
Other materials:
Installation Procedure
Align the rocker inner panel.
Clean and prepare the attaching surfaces for spot welding.
Apply structural adhesive to all attaching surfaces.
Position the rocker inner panel on the
vehicle.
Verify the fit of the quarter outer panel
Clamp the rocker inner panel into posi ...
Front Side Door Adjustment
Preliminary Procedure
Remove the front wheelhouse liner. Refer to Front Wheelhouse Liner
Replacement.
Front Side Door
Caution: Refer to Fastener Caution in the Preface section.
Procedure
Loosen the front side door hinge bolt (Qty: 4) to adjust the front
side door.
Adjust the ...
Rear Compartment Lid Emblem/Nameplate Replacement (VCDi AT)
Rear Compartment Lid Emblem Assembly
Caution: Refer to Exterior Trim Emblem Removal Caution in the
Preface section.
Procedure
The part and surface should be 21°C (70°F) prior to installation. The
vehicle should remain 21°C (70°F) for
one hour after assembly to allow adhesive to deve ...
