Chevrolet Cruze Infotainment System: Destination
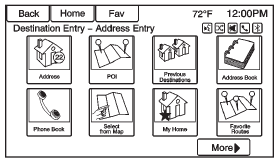
If route guidance is not active, press the Destination Entry screen button on the Home Page to access the Destination Entry screen. Several options can be selected to plan a route by entering destinations.
Some destination entry items such as Previous Destinations, Address Book, and My Home may be grayed out if no destination was previously entered or saved.
Alpha-Numeric Keyboard
Letters of the alphabet, symbols, punctuation, and numbers, when available, display on the navigation screen as alpha/numeric keyboards.
The alpha keyboard displays when data needs to be entered.
QWERTY or ABCDEF:
Press to toggle between QWERTY or ABCDEF keyboard character layouts.
Symbols
: Use to select symbols.
Space
: Use to enter a space between characters or the words of a name.
Delete
: Press to delete an incorrect character that has been selected.
Address Entry
Press the Address screen button to display the Enter Address screen.
Set a route by entering the state name, city name, street name, house number, and intersection.
If no state or province has been entered previously, the city and state fields are not available. Press the screen button at the right of the city name to select a state or province.
If the state or province was previously set and is displayed, press the screen button at the right of the city name to change the selected state or province.
To make name selection easier, the system highlights only characters that are available after the previously entered one.
State
: Enter a state name.
City
: Enter a city name.
Street
: Enter a street name.
House
No
.: Enter a valid address number.
Intersection: Enter a street name that intersects with the selected street.
Entering the city name first: 1. Enter the city name.
2. Enter the street name. Use the Delete screen button to delete an incorrectly entered character.
A list displays if six or fewer names are available. If there are more than six, there is a match counter with a number of available streets. Press the List screen button to view the list and select the street.
3. Enter the house number.
4. Press the Done screen button at any time and the system tries to resolve a destination based on the entered information, then displays it on the Destination Confirmation screen.
5. Press the Start Guidance screen button and the route calculates.
To Enter a Destination in Canads
To change the destination address from the United States to Canada, the country will need to change in the navigation system. To change the country address: 1. Press the Destination screen button on the Home Page.
2. Press the address screen button to display the Enter Address screen.
3. Go to the State/Province line option and select. The Province entry screen displays. Select the Country line option. The Country List displays.
4. Select Canada.
5. Enter Province and confirm the selection.
Entering a Destination in Other Countries
To change the destination address from the United States to another country, the country will need to change in the navigation system.
To change country address: 1. Press the Destination screen button on the Home Page.
2. Press the Address Entry screen button to display the Address Entry screen.
3. Go to the State/Province line option and select. The State/ Province entry screen displays. Select the Country line option.
The available Country List displays.
4. Select the desired country. For example, select Canada as a default country.
5. Enter State/Province. For example, enter Ontario and confirm the selection.
The destination in other countries can also be changed using voice recognition.
Points of Interest (POI)
Press the Points of Interest screen button on the Destination Entry page. Several options can be selected to plan a route.
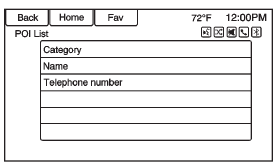
The POI entry list allows selection of a destination search by category, name, or number.
Entering by POI name:
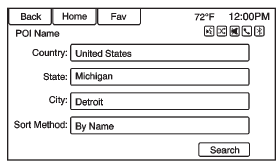
1. Select Search by Name.
2. Make sure the correct country, state, city are present, then select Search.
3. Enter the POI name.
4. Select a few of the characters or spell the name in full, by using the alpha keyboard.
5. Press the List screen button, or if the list has six or fewer items, a list of POIs will immediately display.
6. Press the desired POI.
7. Press the Start Guidance screen button and the route calculates.
Previous Destinations
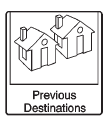
Select a destination from the Previous Destination List. Up to 15 points that have been previously entered can be recalled. If the list is full, the oldest destinations are automatically deleted once the newest destinations are added.
Address Book

If no destination is saved to the address book, save a destination: 1. Press Destination on the Home Page.
2. Enter an address using any of the destination methods (Address Entry, POI Entry, etc.).
3. On the Destination Confirmation screen, select Save.
4. The system displays the options Name, Number, Icon, and Done.
Press Done to save the destination.
5. To customize the address book entry, select Name, Number, or Icon.
If a destination is already saved to the address book, press Destination Entry on the Home Page to display the Address Book screen button.
Choose a destination by selecting an address that has been stored in the address book.
1. Press the Address Book screen button. A list displays the address book entries.
2. Select the destination from the list.
3. Press the Start Guidance screen button and the route calculates.
To edit Address Book entries: 1. Select an item from the address book.
2. On the Destination Confirmation screen, select Edit.
3. The system displays the options Name, Number, Icon, and Delete. Press Delete to delete the destination from the address book.
4. To customize the address book entry, select Name, Number, or Icon.
Latitude/Longitude Coordinates
Choose a destination based on latitudinal and longitudinal coordinates.
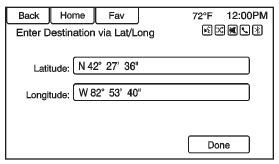
To enter the location as coordinates, latitude and longitude: 1. Press Destination on the Home Page. Press the Latitude and Longitude screen button to display the screen above.
2. Select Latitude or Longitude to change. Enter the coordinates in degrees, minutes, and seconds.
Then press Back to save and exit.
3. Press the Search screen button if the information is correct.
4. Press the Start Guidance screen button. The route calculates
Favorite Routes
Adding a Favorite Route: 1. Press the Home Page Destination Entry button to display the Favorite Routes screen button.
2. Press the Favorite Routes screen button to display Add Favorite Route.
3. Select Add Favorite Route and enter a favorite route name.
4. Press OK and the display returns to the favorite routes list.
5. Select the favorite route and add a waypoint using any of the destination methods, such as address entry, POI entry, etc.
Selecting a Favorite Route: 1. Press the Home Page Destination Entry button to display the Favorite Routes screen button.
2. Press the Favorite Routes screen button to display a list of available favorite routes.
3. Scroll and select a favorite route.
4. Press the Start Guidance screen button. The route calculates.
Deleting a favorite route: 1. Press the Home Page Destination Entry button to display the Favorite Routes screen button. Press this button to display the list of available favorite routes.
2. Scroll and select the route to be deleted.
3. Press Edit.
4. Press Delete Favorite Route.
Changing the route name: 1. Press the Home Page Destination Entry button to display the Favorite Routes screen button. Press this button to display the list of available favorite routes.
2. Press the Edit screen button.
3. Select Edit Name.
4. Using the keypad, enter the name.
5. Press the Done screen button.
The new name will be in the Favorite Routes Menu.
My Home
If no home destination is entered, save a destination by pressing the Home Page Destination Entry button. Enter a destination using any of the destination entry methods (Address Entry, POI Entry, etc.).
Select Save as Home from the Destination Confirmation screen.
If a destination is already saved as home, press the Home Page Destination Entry button to display the My Home screen button. Press this button to start route guidance.
Select from Map
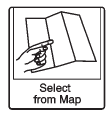
• Press the Home Page Destination Entry button to display the Select from Map screen button. Press this button to display the map screen with a scroll symbol centered on the map.
• Press the Zoom in/out button on the screen and press the map to locate the destination to select.
Press and hold a finger on the map to activate fast scrolling.
• Press the Go button on the bottom of the screen to display the Destination Confirmation screen.
• Press the Start Guidance screen button. The route calculates.
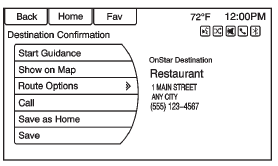
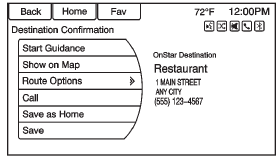
Destination Confirmation
Multiple options are available on the Destination Confirmation screen: Start Guidance:
Press to start a route calculation to the displayed destination.
Show on Map:
Press to switch to the map view with the displayed destination centered on the map.
Route Options:
Press to change route options. See “Route Options” following.
Call
: Press to initiate a phone call to the displayed phone number, if phone capability is available.
Save as Home:
Press to save the displayed destination as your home destination. The home destination will be stored at the top of the list of destinations in the address book.
Save/Edit
: Press to save the displayed destination into the address book. If the displayed destination is already stored in the address book, Edit will show as the menu item.
Route Options
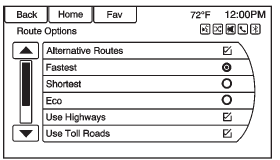
Press to display various route options.
Alternative Routes:
If enabled, the system will provide an additional screen after Start Guidance has been selected. Select Fastest, Shortest, or Eco calculated routes before selecting GO.
Fastest
: This calculates for the quickest route.
Shortest
: This calculates for the shortest route.
Eco
: This calculates for the most fuel efficient route based on speed and distance.
Under the Route Options menu, there are route preferences that by default are all enabled.
A checkmark placed next to each preference indicates this. All of these preferences are used when calculating the route. If any of these preferences are unselected, the route will be calculated without including these preferences.
Use Highways:
Deselect to avoid major roads.
Use Toll Roads:
Deselect to avoid toll roads.
Use Ferries:
Deselect to avoid ferries.
Use Tunnels:
Deselect to avoid tunnels.
Use Time Restricted:
Deselect to avoid time restricted roads.
Use Car Train:
Deselect to avoid car trains.
Menu with Route Guidance Active
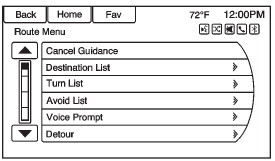
Several functions can be performed after a destination has been entered. Press the Home Page Destination Entry screen button to access the Destination Menu screen.
Cancel Guidance
Press Cancel Guidance to cancel the current route.
Destination List
Select Destination List to view options for organizing waypoints.
Turn List
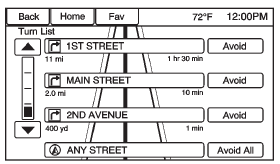
Select Turn List to view a list of maneuvers for the entire route.
Press the Avoid screen button next to one of the turn maneuvers to avoid a segment of roads.
A maximum of eight avoided segments are allowed.
Avoid List
Select Avoid List to display a list of avoided road segments with the option to remove the avoided items from the list.
Detour
Press Detour to display the route detour options. Select to detour the whole route or by a specific distance.
Route Options
This feature can be accessed from the Destination Confirmation Menu and Destination Menu with Route Guidance Active. See “Destination Confirmation” for more information.
Voice Prompt
Select Voice Prompt to view options to disable or manage navigation voice prompts and traffic alert prompts.
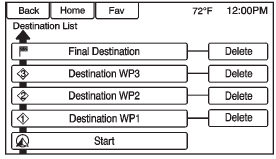
Waypoints
Up to three waypoints can be added to the current route. The waypoints can be sorted (moved) or deleted.

To add a waypoint:
1. From the Destination List menu, press Add Waypoint.
2. Enter the waypoint by any of the add destination methods. The system calculates and highlights the route and the route can be started.
3. To add more waypoints, press Add Waypoint to add the waypoint in the order desired on the route.
To delete a waypoint: 1. From the Destination menu, press Destination List.
2. Press Delete Waypoints.
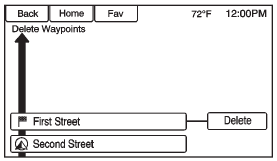
3. Select the waypoints to be deleted. Press the Delete screen button.
The Sort Waypoint feature allows reorganization of the destination list.
To sort a waypoint:
1. From the Destination menu, press Destination List.
2. Press Sort Waypoints.
3. Select the waypoint to move.
4. Select the location to move the waypoint to.
Instead of deleting individual waypoints, select Delete All Waypoints to delete all waypoints at the same time.
To save a destination list as a favorite route, select Save as Favorite Route.
 Navigation Symbols
Following are the most common symbols that appear on a map screen.
The vehicle symbol indicates the current position and heading direction of the
vehicle on the map.
The destination symbol mar ...
 OnStar® Destination Download
The destination download lets an OnStar® subscriber ask an OnStar Advisor to
download a destination to the navigation system. OnStar will send address information
and location coordinates of the d ...
Other materials:
StabiliTrak® System
The vehicle has a vehicle stability enhancement system called StabiliTrak. It
is an advanced computer controlled system that assists with directional control
of the vehicle in difficult driving conditions.
StabiliTrak activates when the computer senses a difference between the intended
path, ...
Engine Oil Life System
The engine oil life system calculates engine oil life based on vehicle use and
displays the CHANGE ENGINE OIL SOON DIC message or Code 82 DIC message when it is
necessary to change the engine oil and filter.
Remember, the Oil Life display must be reset after each oil change. It will not
reset ...
When Should an Airbag Inflate?
This vehicle has advanced technology frontal airbags. Frontal airbags are designed
to inflate in moderate to severe frontal or near frontal crashes to help reduce
the potential for severe injuries, mainly to the driver's or front outboard passenger's
head and chest.
However, they are ...
