
Chevrolet Cruze Infotainment System: OnStar® Destination Download
The destination download lets an OnStar® subscriber ask an OnStar Advisor to download a destination to the navigation system. OnStar will send address information and location coordinates of the destination into the navigation system.
Using Destination Download
If the navigation radio screen is turned off before a download, the system automatically turns the screen on and displays a download confirmation message. The radio remains on after the download.
The navigation system displays “Please wait” as the address is searched within the map database.
If the address is not found within the map database, the system may use latitude and longitude coordinates to locate the destination.
If the system is unable to locate the address, the Destination Not Found screen displays.
Route Guidance Not Active
If an OnStar destination is downloaded while route guidance is not active, the navigation system displays a pop-up screen with the following screen functions:
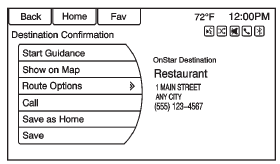
Start Guidance:
Press to start route calculation to the destination(s) received.
Show on Map
: Press to display the Map Screen.
Call
: Press to initiate a call with Bluetooth Phone (if available) or OnStar Hands-Free Calling.
Save as Home:
Press to set an address as a home destination.
Save: Press to save the downloaded destination to the address book.
Route Guidance Active
If an OnStar destination is downloaded while route guidance is already active, the system displays a pop-up screen with the following screen function: • Press Start Guidance; the navigation system adds the downloaded destination before the next waypoint of the existing route (closest to the current vehicle position).
• All other buttons on the pop-up screen operate as described under “Route Guidance Not Active.”
Previous Destinations
Previously downloaded OnStar destinations are saved under Previous Destinations in the navigation system, where they can be accessed or saved to the Address Book.
 Destination
If route guidance is not active, press the Destination Entry screen button on
the Home Page to access the Destination Entry screen. Several options can be selected
to plan a route by entering de ...
 Configure Menu
The Configuration Menu is used to adjust features and preferences, such as Sound,
Radio, Nav (Navigation), Display, or Time Settings.
1. Press the Config screen button on the Home Page.
2. Tou ...
Other materials:
Air Conditioning Condenser Replacement (1.6L LDE, LXT, LXV, and 1.8L 2H0)
Removal Procedure
Recover the refrigerant. Refer to Refrigerant Recovery and Recharging.
Disconnect battery negative cable. Refer to Battery Negative Cable
Disconnection and Connection.
Remove front bumper fascia. Refer to Front Bumper Fascia Replacement.
Remove air intake duct ...
Service Vehicle Messages
SERVICE AC SYSTEM
This message displays if there is a problem with the air conditioning system.
Take the vehicle to your dealer for service.
SERVICE POWER STEERING
This message displays if there is a problem with the power steering system. Take
the vehicle to your dealer for service.
SERVICE ...
Installation Procedure
Cut the front compartment upper side rail in corresponding locations to
fit the remaining original panel. The sectioning joint should
be trimmed to allow a gap of one-and-one-half-times the metal thickness at
the sectioning joint.
Create a 50 mm (2 in) backing plate from the unused ...
