Chevrolet Cruze Repair Manual: Removal Procedure
Warning: Refer to Approved Equipment for Collision Repair Warning in the Preface section.
Warning: Refer to Glass and Sheet Metal Handling Warning in the Preface section.
- Disable the SIR System. Refer to SIR Disabling and Enabling.
- Disconnect the negative battery cable. Refer to Battery Negative Cable Disconnection and Connection.
- Remove all related panels and components.
- Visually inspect the damage. Repair as much of the damage as possible.
- Remove the sealers and anti-corrosion materials from the repair area, as necessary. Refer to Anti-Corrosion Treatment and Repair.
- Locate and mark all the necessary factory welds of the body side outer lower panel.
Note: Note the number and location of welds for installation of the service assembly.
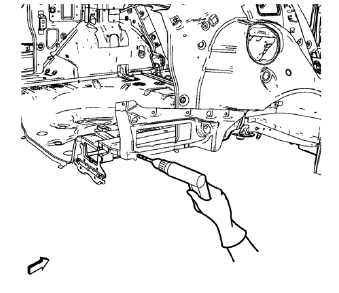
- Drill all factory welds.
- Remove the body side outer lower panel.
 Body Side Outer Lower Panel Replacement (MIG-Brazing)
Note: According to different corrosion warranties, only the
regional mandatory joining methods are allowed. ...
 Installation Procedure
Clean and prepare the attaching surfaces for welding.
Apply structural adhesive to the attaching flanges.
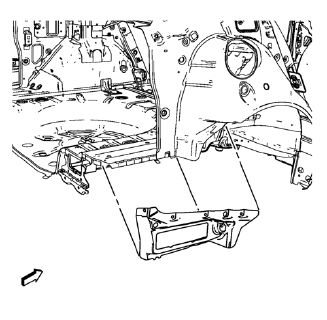
Position the body side outer lower panel on the vehicle
Verify the fit of the ...
Other materials:
Service Publications Ordering Information
Service Manuals
Service Manuals have the diagnosis and repair information on the engines, transmission,
axle, suspension, brakes, electrical, steering, body, etc.
Service Bulletins
Service Bulletins give additional technical service information needed to knowledgeably
service General Motors c ...
Reporting Safety Defects to the United States Government
If you believe that your vehicle has a defect which could cause a crash or could
cause injury or death, you should immediately inform the National Highway Traffic
Safety Administration (NHTSA) in addition to notifying General Motors.
If NHTSA receives similar complaints, it may open an investig ...
Reporting Safety Defects to General Motors
In addition to notifying NHTSA (or Transport Canada) in a situation like this,
notify General Motors.
Call 1-800-222-1020, or write:
Chevrolet Motor Division
Chevrolet Customer Assistance
Center
P.O. Box 33170
Detroit, MI 48232-5170
In Canada, call 1-800-263-3777
(English) or 1-800-263-785 ...
