
Chevrolet Cruze Owners Manual: Filling the Tank
WARNING
Fuel vapors and fuel fires burn violently and can cause injury or death.
• To help avoid injuries to you and others, read and follow all the instructions on the fuel pump island.
• Turn off the engine when refueling.
• Keep sparks, flames, and smoking materials away from fuel.
• Do not leave the fuel pump unattended.
• Do not reenter the vehicle while pumping fuel.
• Keep children away from the fuel pump and never let children pump fuel.
• Fuel can spray out if the fuel cap is opened too quickly.
This spray can happen if the tank is nearly full, and is more likely in hot weather.
Open the fuel cap slowly and wait for any hiss noise to stop then unscrew the cap all the way
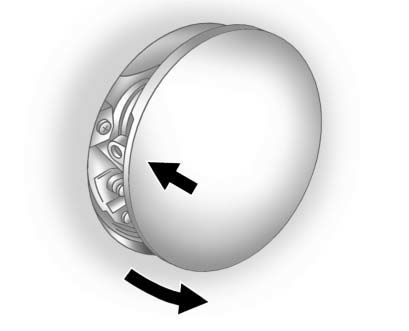
The tethered fuel cap is behind the fuel door on the vehicle's passenger side. To open the fuel door, push the rearward center edge in and release. When applied pressure is removed, the fuel door will spring partially open.
Turn the fuel cap counterclockwise to remove. Reinstall the cap by turning it clockwise until it clicks.
If the cap is not properly installed, the malfunction indicator lamp will come on.
Do not top off or overfill the tank.
Wait a few seconds before removing the nozzle. Clean fuel from painted surfaces as soon as possible.
WARNING
If a fire starts while you are refueling, do not remove the nozzle. Shut off the flow of fuel by shutting off the pump or by notifying the station attendant.
Leave the area immediately.
Notice: If a new fuel cap is needed, be sure to get the right type of cap from your dealer. The wrong type of fuel cap might not fit properly, might cause the malfunction indicator lamp to light, and could damage the fuel tank and emissions system.
 Fuel Additives
To provide cleaner air, all gasolines in the United States are now required to
contain additives that help prevent engine and fuel system deposits from forming,
allowing the emission control syste ...
 Filling a Portable Fuel Container
WARNING
Filling a portable fuel container while it is in the vehicle can cause fuel
vapors that can ignite either by static electricity or other means. You or others
could be badly burned and the ...
Other materials:
Steering Knuckle Replacement
Preliminary Procedure
Raise and support the vehicle. Refer to Lifting and Jacking the
Vehicle
Remove the wheel bearing and hub assembly. Refer to Front Wheel Bearing
and Hub Replacement.
Separate the outer tie rod end from the knuckle. Refer to Steering
Linkage Outer Tie R ...
Automatic Transmission
It is better not to park with the engine running.
If the vehicle is left with the engine running, follow the proper steps to be
sure the vehicle will not move.
If parking on a hill and pulling a trailer.
The automatic transmission has a shift lever located on the console between the
seats.
...
Instrument Panel Assembly Replacement
Preliminary Procedures
Disable the SIR system. Refer to SIR Disabling and Enabling
Remove the front floor console assembly. Refer to Front Floor Console
Replacement.
Remove the radio assembly. Refer to Radio Replacement.
Remove the driver information display bezel. Refer ...
