Chevrolet Cruze Repair Manual: Front Bumper Energy Absorber Bracket Replacement
Preliminary Procedure
Remove the front bumper fascia opening cover. Refer to Front Bumper Fascia Opening Lower Cover Replacement
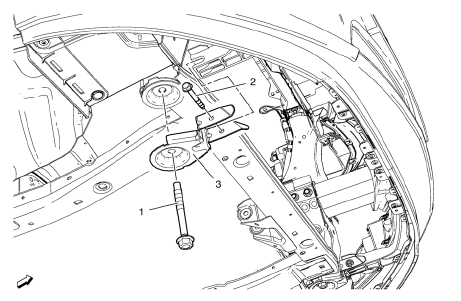
- Drivetrain and Front Suspension Frame Bolt Front
Caution: Refer to Fastener Caution in the Preface section.
Tighten 160 N·m (119 lb ft) Note: Do NOT reuse the old bolt.
- Front Bumper Energy Absorber Bracket Bolt
Tip
For removal only loosen the bolt.
Tighten
22 N·m (17 lb ft)
- Front Bumper Energy Absorber Bracket
Note: Secure the drivetrain and front suspension frame with hydraulic jack.
Front Bumper Impact Bar Replacement
The front bumper impact bar is welded on, and must be replaced at the factory welds to retain structure integrity. Refer to Front Bumper Impact Bar Replacement.
 Bumpers and Fascias
Specifications
Front Bumper Energy Absorber Replacement
Preliminary Procedure
Remove the front bumper fascia. Refer to Front Bumper Fascia Replacement.
Front Bumper Energy Absorber
P ...
 Front Bumper Fascia Replacement
Preliminary Procedure
Remove the front bumper fascia opening cover. Refer to Front Bumper Fascia
Opening Lower Cover Replacement.
Front Wheelhouse Liner Bolt (Qty: 8)
Caution: Refer to Fa ...
Other materials:
Basecoat/Clearcoat Paint Systems
Warning: Exposure to isocyanates during paint preparation and
application processes can cause severe breathing problems. Read and
follow all of the instructions from the manufacturers of painting materials,
equipment, and protective gear.
All paint finish repairs of rigid exterior surfaces mus ...
Rear Compartment Lid Adjustment
Rear Compartment Lid
Caution: Refer to Fastener Caution in the Preface section.
Procedure
Loosen the rear compartment lid hinge bolt (Qty: 4) to
adjust the rear compartment lid.
Adjust the rear compartment lid in order to obtain an even gap between
the rear compartment ...
Installation Procedure
Create 6 x 20 mm (4/16 x 11/16 in) slots for MIG-brazing along the upper
edges of the service panel as noted from the original
panel.
Clean and prepare the attaching surfaces for brazing and spot welding.
Position the body lock pillar inner panel on the vehicle.
Verify the ...
