Chevrolet Cruze Repair Manual: Front Floor Panel Carpet Replacement
Preliminary Procedures
- Remove front seats. Refer to Driver or Passenger Seat Replacement.
- Remove rear seat. Refer to Rear Seat Replacement.
- Remove the front floor console. Refer to Front Floor Console Replacement.
- Remove front sill panels. Refer to Front Side Door Sill Trim Plate Replacement.
- Remove rear sill panels. Refer to Rear Side Door Sill Trim Plate Replacement.
- Remove center pillar lower garnish moldings. Refer to Center Pillar Lower Garnish Molding Replacement.
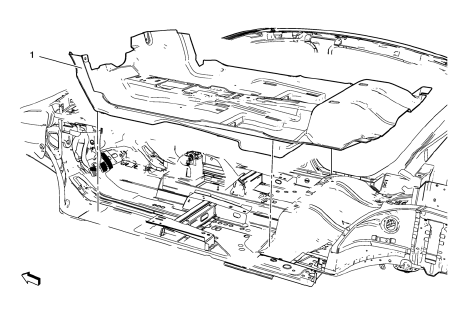
Front Floor Panel Carpet Assembly
Procedure
Loosen Transmission Control.
 Floor Carpet Drying
If the carpet or the pad or insulator is wet, use the following criteria for
drying or for replacing the components:
For a 1-piece carpet assembly bonded to a cotton or a fiber padding,
repla ...
 Headlining Trim Panel Replacement (With Sunroof)
Warning: Do not attempt to repair or alter the head impact
energy-absorbing material glued to the headliner or to the garnish
trims. If the material is damaged, replace the headliner and/or the ...
Other materials:
Engine Power Messages
ENGINE POWER IS REDUCED
This message displays when the vehicle's engine power is reduced.
Reduced engine power can affect the vehicle's ability to accelerate.
If this message is on, but there is no reduction in performance, proceed to your
destination. The performance may be reduced the ...
Steering Knuckle Replacement
Preliminary Procedure
Raise and support the vehicle. Refer to Lifting and Jacking the
Vehicle
Remove the wheel bearing and hub assembly. Refer to Front Wheel Bearing
and Hub Replacement.
Separate the outer tie rod end from the knuckle. Refer to Steering
Linkage Outer Tie R ...
Service
This vehicle may have the new environmentally friendly refrigerant, R1234yf.
This refrigerant has a significantly reduced global warming impact on the environment,
compared to the traditional automotive refrigerant, R-134a. All vehicles have a
label underhood that identifies the refrigerant us ...
