Chevrolet Cruze Owners Manual: Keys
WARNING
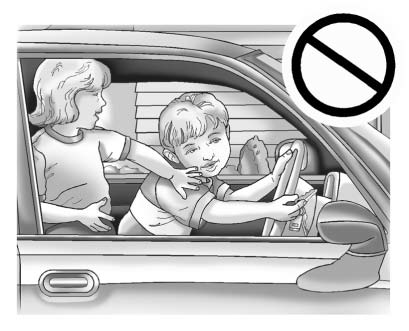
Leaving children in a vehicle with the ignition key is dangerous and children or others could be seriously injured or killed. They could operate the power windows or other controls or make the vehicle move. The windows will function with the keys in the ignition, and children or others could be caught in the path of a closing window. Do not leave children in a vehicle with the ignition key.
WARNING
Leaving children in a vehicle with a Remote Keyless Entry (RKE) transmitter is dangerous and children or others could be seriously injured or killed. They could operate the power windows or other controls or make the vehicle move. The windows will function with the RKE transmitter in the vehicle, and children or others could be caught in the path of a closing window. Do not leave children in a vehicle with an RKE transmitter.
The key that is part of the Remote Keyless Entry (RKE) transmitter can be used for the ignition and all locks if the vehicle is a key access vehicle. If the vehicle has the keyless ignition, the key can be used for the locks.
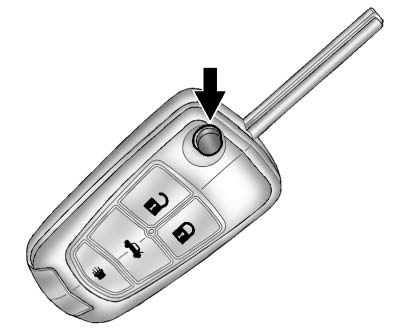
Press the button on the RKE transmitter to extend the key. Press the button and the key blade to retract the key.
If it becomes difficult to turn the key, inspect the key blade for debris.
Periodically clean with a brush or pick.
See your dealer if a new key is needed.
With an active OnStar subscription, an OnStar Advisor may remotely unlock the vehicle.
 Keys and Locks
...
 Remote Keyless Entry (RKE) System
If there is a decrease in the RKE operating range:
• Check the distance. The transmitter may be too far from the vehicle.
• Check the location. Other vehicles or objects may be blocking the signal.
...
Other materials:
Rear Wheel Bearing and Hub Replacement (Disc Brake)
Special Tools
EN 45059 Torque Angle Sensor Kit
For equivalent regional tools, refer to Special Tools.
Removal Procedure
Raise and suitably support the vehicle. Refer to Lifting and
Jacking the Vehicle.
Remove the tire and wheel assembly. Refer to Tire and Wheel Removal and
...
Removal Procedure
Raise and support the vehicle. Refer to Lifting and Jacking the
Vehicle.
Remove the tire and wheel. Refer to Tire and Wheel Removal and
Installation.
Note: DO NOT re-use the lower control arm bolts and nuts. Discard
and use NEW only.
Remove wheel speed sensor wiring harness ...
Strut Assembly Replacement
Special Tools
CH 49375 Wrench
For equivalent regional tools, refer to Special Tools.
Removal Procedure
Raise and the vehicle. Refer to Lifting and Jacking the Vehicle.
Remove the tire and wheel assembly. Refer to Tire and Wheel Removal and
Installation.
Separate the brake hose ...
