Chevrolet Cruze Repair Manual: Rear Wheel Bearing and Hub Replacement (Disc Brake)
Special Tools
EN 45059 Torque Angle Sensor Kit
For equivalent regional tools, refer to Special Tools.
Removal Procedure
- Raise and suitably support the vehicle. Refer to Lifting and Jacking the Vehicle.
- Remove the tire and wheel assembly. Refer to Tire and Wheel Removal and Installation.
- Without disconnecting the hydraulic brake flex hose, remove and support the rear brake caliper and bracket as an assembly, and remove the rear brake rotor. Refer to Rear Brake Rotor Replacement.
Caution: Support the brake caliper with heavy mechanic wire, or equivalent, whenever it is separated from its mount and the hydraulic flexible brake hose is still connected. Failure to support the caliper in this manner will cause the flexible brake hose to bear the weight of the caliper, which may cause damage to the brake hose and in turn may cause a brake fluid leak.
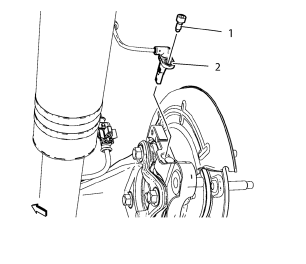
- Remove the wheel speed sensor bolt (1).
- Remove the wheel speed sensor (2).
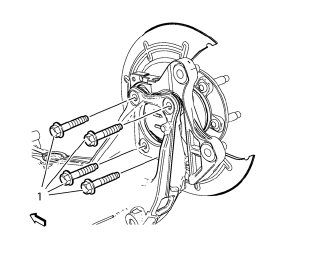
- Remove and discard the wheel bearing/hub mounting bolts (1).
- Remove the wheel bearing/hub assembly (1) and rear brake shield (2) from the rear axle.
Installation Procedure

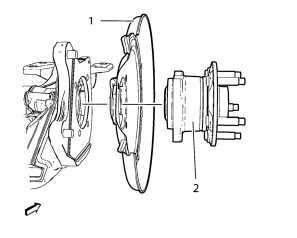
- Position the rear brake shield (2) and wheel bearing/hub assembly (1) in the rear axle.
Caution: Refer to Fastener Caution in the Preface section.
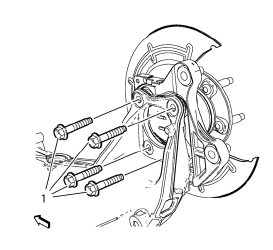
- Install the NEW wheel bearing/hub mounting bolts (1) and tighten to 50 N·m (37 lb in) + 40° using the EN 45059 kit .
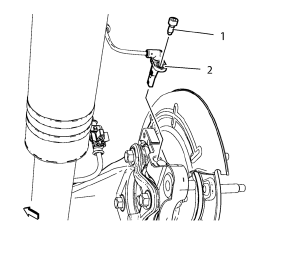
- Install the wheel speed sensor (2).
- Install the wheel speed sensor screw (1) and tighten to 6 N·m (54 lb in). Tighten the bolts evenly, in a cross-pattern.
- Install the brake rotor, and install the brake caliper and bracket as an assembly. Refer to Rear Brake Rotor Replacement.
- Install the tire and wheel assembly. Refer to Tire and Wheel Removal and Installation.
- Remove the support and lower the vehicle.
 Rear Suspension
Specifications
Rear Suspension Components
Rear Shock Absorber Upper Mount
Rear Shock Absorber Upper Mount
Rear Shock Absorber Upper Mount
Rear Shock Absorber Upper Mount
Shock Abs ...
 Rear Wheel Bearing and Hub Replacement (Drum Brake)
Special Tools
EN 45059 Torque Angle Sensor Kit
For equivalent regional tools, refer to Special Tools.
Removal Procedure
Raise and suitably support the vehicle. Refer to Lifting and ...
Other materials:
Rear Compartment Lid Emblem/Nameplate Replacement (Cruze - Right Side)
Rear Compartment Lid Emblem Assembly
Caution: Refer to Exterior Trim Emblem Removal Caution in the Preface
section.
Procedure
The part and surface should be 21°C (70°F) prior to installation. The
vehicle should remain 21°C (70°F) for
one hour after assembly to allow adhesive to deve ...
Vehicle Identification Number (VIN)
This legal identifier is in the front corner of the instrument panel, on the
left side of the vehicle. It can be seen through the windshield from outside. The
VIN also appears on the Vehicle Certification and Service Parts labels and certificates
of title and registration.
Engine Identifi ...
Installation Procedure
Note: If the location of the original plug weld holes can not be
determined, space the braze holes every 40 mm (1½ in).
Create 5 x 18 mm (4/16 x 11/16 in) slots for MIG-brazing along the edges
of the rear floor panel filler as noted from the original
panel.
Clean and prepare ...
